
Practical things you can do to grow as an artist (not just technical skills).
Read MoreAdvice
083. YouTube Update

Working hard to provide quality content for my YouTube channel.
Read More
082. "Consistency is Key!" - Why I hate this statement.
in Artist Diary
Ever get tired of the social media rat race?
Read More077. The Value of Value Studies for a Painter

Why studies are an important part of your artistic breakfast.
Read More
071. How to Grow Your Social Media: Tips for Artists Online
Note: This post is geared specifically towards artists!
I am writing this from my personal experience, which is from an introverted artist who makes a living online (who has never shown or sold anything in a gallery).
It is written for those who want to transform their social media platforms into tools that will help them succeed.
To diversify the research shared here, I asked a fellow artist for some input, who has seen incredible success through social media: Kay Pike Fashion. She ended up making these AMAZING, helpful visual diagrams sharing her story of how she grew to 270K+ followers in 1 year! (Thanks Kay!)
Twitch.tv/kaypikefashion
(Click the links in the descriptions below each image to see the full version)


One final disclaimer: Don't take the advice here, or any advice, as the only way to do things! There are so many methods to grow your following, and while lots of these tips are universal, you might find a totally different path that works for you. This is meant to help get your started, get you thinking about the options.
The Basics of Social Media and Why It's Important for Artists to Understand the Innerworkings
It's rare to meet someone who doesn't have at least one profile on a social media platform.
So, hopefully if you are reading this, you have at least some idea of how social media works.
At it's most basic: You create a profile, people "follow" your account, and can interact (either by commenting or merely "liking" a post by clicking a little button).
But did you know that almost all social media platforms are using algorithms which prioritize posts that have higher engagement? Or that the time of day in which you post something can have a huge impact on how much interaction it gets (or whether it gets seen at all)?
The days of simplicity for business owners died when the internet was born. We are social beings, and it was inevitable that social media would develop and become a huge part of our lives and businesses. For businesses to thrive, it's essential that they connect with their users/consumers on a personal level. For artists, this resonates even deeper. Our art is incredibly personal, and we don't want to be seen as just a product.
If selling work or being a well known artist is the treasure chest, then social media is the treasure map. Navigating it can be tricky, but there are lots of strategies that work on many platforms!
You can survive the trek, or you can thrive. You can learn to use social media as a tool to help your business grow.
And yes, you are a business. An artist who wants to make a living off of their art needs to consider themselves a business. To be honest, I hate the business side more than anything, but since I've faced the music, my business started to thrive and I make a humble living as an artist. I could be doing a lot better if I put more effort into marketing and such, but I already feel overwhelmed by my to-do list most days. So I do what I can, and that little amount goes a long way!
If you are in the same boat, just know that you CAN be a successful artist while still maintaining some distance from social media. It doesn't have to completely consume you.
I should note that social media is constantly evolving. By the time you read this post, there may be a totally new platform being born, or a major change in an existing one! But over the last two years, I have noticed some constants that helped with my growth, and have been confirmed by fellow artists.
Here's everything I know!
1. Decide Where You Want to Post. What is your purpose?
Since there are SO many social media platforms, especially for artists, it can be daunting and exhausting to try to grow on every single one from the start. In fact, you may end up spreading yourself too thin trying to use all of them, which would take away from your craft. You can waste a lot of time and energy if you don't know why, what, where or when to post things.
The main social media platforms for artists at the time of this post are (in order of popularity starting with Facebook): Facebook, YouTube, Instagram, Tumblr, Twitter, Pinterest.
In this blog post, I will discuss Facebook, Twitter, Instagram, and YouTube.
Being an artist, and even more so making a living as an artist, is already exhausting. It's not just about painting/drawing/etc. - that's a huge part of it, but you also have a huge daily to-do list: documenting your work, updating your portfolio, answering emails, fulfilling orders & commissions, packing/shipping, networking, etc.
Now add keeping up a consistent presence on social media to the list - and it sometimes feels like there's no time left to paint!
As a one-person-show, you need to maximize your time and use your tools efficiently.
When deciding which platform to grow on first, consider what type of art you do and whether it is conducive to that platform. Decide what is most important about your brand/business. What do you want to tell/show the world?
For instance, if you are a painter, you can usually get by with posting photos of your work and engaging with users on all of the platforms, so you might as well choose the most popular - either Facebook or Instagram. If you are a 3D Graphics artist, maybe YouTube is the best for you but you will want to cross-polinate (see #7).
Word of mouth is huge for artists, and almost everyone uses Facebook, so it's a natural way to network, especially to people who may otherwise never see your art.
Note: At the time of this post, I barely use Facebook (I stepped away a few years ago because I was becoming too consumed by it. At the moment, I only update it like twice a year.
I KNOW I would get more business if I used it to share my art. In fact, whenever I DO post an update, I usually get one or two sales/commission requests. And that's only from super rare posts! I know many artists who thrive using Facebook, and it's an AMAZING tool. I used it exclusively several years ago for my photography business and was very successful. While it's not something I use that much at the moment, I highly recommend it to other artists!
I have a slightly different story of how I grew my social media - something that the average artist may not experience. I started out on Twitch.tv - which is mainly a video game platform, but on a fluke, discovered the Creative community there. About two years ago I started streaming my art process (people can watch me paint and interact with a live chat system). There are millions of users on Twitch, and while most of them are there to watch people play video games, a small percent watch the creative streams like mine, and that small percentage was way bigger than I imagined. Within one year, I had 10,000 followers, and from those followers, my other social media platforms grew by word-of-mouth. I now have around 2,000 followers on both Twitter and Instagram (the only other social media platforms I use). That's not a lot, but it's enough for me to do this full time.
Between Twitch, Instagram, and Twitter, I make a living as an artist. (There's also Patreon, but I don't consider that a social media platform...yet. People don't just hang out there and share stuff. They go there specifically to support a user.)
As I mentioned before, I make my living solely online. I do not show or sell my work in physical galleries.
(I want to...someday)
Anyways...without Twitch, I would never have grown on the other platforms this quickly.
I was able to pour ALL my energy into my art streams on Twitch, while simultaneously growing on Twitter and Instagram. Now, if I suddenly stopped streaming on Twitch (which isn't happening), I would have a larger following on social media to work with, and I could pour all my energy into those.
Final thought on this: to truly maximize the potential of a platform involves tons of engagement - like several times a day on each one. Not posting several times a day, but interacting. That's why I emphasize starting out focusing on one or two until you get your feet wet.
2. Quality over Quantity, and be Consistent!
Be careful with "over posting" on your platforms. You can end up desensitizing your followers, OR drive them away with unrelated posts. For example, if you are growing your following on Facebook by mainly posting photos of your artwork, announcements about sales, or links to your shop/website, posting once every other day is a great way to keep everyone informed! Posting once a day can also be great, if you vary your content. Posting two or more times per day, or posting a lot of random things, like a photo of the burger you had for lunch or your political views, is going to over saturate and maybe even turnoff your followers.
(Rule of thumb, don't mix business with personal hot-button topics like politics).
I post on Instagram at least once per day, and for the last several months, have had steady growth. But the thing is, I paint and draw a LOT, so I have a huge pile of work to share. I don't just post for the sake of posting. If I didn't have anything worthwhile to share, I wouldn't. It's much more important to post consistently interesting work than some shite that lowers the average quality of my shared work. Yes, I make some shite art too, but I don't have to share it. It's part of my learning process. Sometimes I DO share it just to show people the process.
Just remember what you put out in the world represents you.
People crave consistency as much as quality. Consistency is very important, not only in terms of WHAT you post, but when you post. For example, you will start to gain a following, and those followers will expect that content from you. If you post a painting every day for a week, those followers will start to expect that consistency. If you suddenly post a photo of your breakfast, you will notice a big difference in the engagement (and you may or may not lose followers). It's your account, you can do whatever you want, but just remember that most people want consistency. (Don't worry about losing followers here and there...it happens!)
Same goes for timing. Try to post at a consistent rate. If you feel you can consistently post once per day, great! If you are posting 2-3 times per week, that's good too. People look forward to your posts and trust the consistent timing. In my experience, people DO unfollow and engage less per post when I post less frequently/sporadically.
3. Time of Day Matters
There are tons of articles about this online already, but the basics are this: Most social media platforms (especially Facebook, Twitter and Instagram) use special statistical algorithms that organize your "feed" for you, based on what they think you want to see. So, your timeline or feed doesn't show posts chronologically like they used to. The order is a result of many computer algorithms at work, analyzing everything you like/comment on/follow in order to make your life "better."
Better? I don't know about that. I don't like a computer making those decisions for me. But...this is the reality of our technological age.
The algorithms take into account how quickly your post gets some sort of engagement after you post it (likes/follows/comments) and those posts filter towards the top of someone's feed/timeline. So, the popular stuff gets seen first/more.
If you want your post to be seen more, you should post it during a time when people who follow you are more actively using that platform. There are lots of sites that post statistics of when Facebook, Twitter, and Instagram have high traffic, and you can find out by doing some searches based on your timezone.
I have been doing tests and really paying attention to mine for the last year or so, in order to discover when MY followers are most active and what time of day works best.
To start out, I highly recommend that you try some tests. Give yourself a three week period. Post stuff in the morning/lunch/night and keep an eye out for when you get more interaction. It will vary based on what you're posting of course, so make sure you give it some time to get a better average.
I've been using @Audiense "Socialbro" app to learn about demographics and traffic. It's free if you have less than 5k followers. It has some pretty interesting stats!
You can use scheduling apps to help ease the burden. For instance, Later.com and Tweetdeck allows you to schedule posts so you can set it up and walk away (Don't forget to interact once it is published).
4. Don't Neglect Your Craft
First and foremost, you are an artist (right?). Continue to grow your skills, and don't lose site of what your craft means to you. Being prolific (creating a lot of work) means you will improve, and you will have more content to share. BUT don't forget... quality over quantity when posting.

5. Customize your Posts for Each Platform
To make our lives easier, most apps allow you to "link" to all of your other social media accounts. So when you post something on Facebook or Instagram, you can instantly share that post on Twitter! Saves time, yay!
The problem with using these built-in sharing options is that they don't utilize the other platform's specific post design.
The lower post was shared directly from Instagram, and includes a link to my Instagram post, but does not include the image itself. I believe it does this to drive more traffic to Instagram. It also cuts off my words.
People are visual creatures. Look at the difference in interaction between that post and one 4 hours later that included an image (which I posted directly on Twitter). It got 2 retweets and 17 more likes. Why? Because it is utilizing the full potential of Twitter's post design - it includes more words and an image.
Don't be lazy like me!
6. Be Engaging & Interactive
When you get overwhelmed, it's tempting to just post things and walk away. And in reality, sometimes that is all we have time for.
However, I've noticed a direct correlation to my growth and individual post success based on how much I interact with users. Both in my own posts (replying to comments) and being genuinely interested in other users and commenting on their work.
Again, we are social creatures. We crave that interaction and it feels GOOD to connect. It leads to richer experiences and relationships. Plus, it just feels better to have genuine connections with people who are interested in what you do (and vise versa).
Don't just be a salesman.
7. Cross Pollination
One effective form of using social media is cross pollination. Since most platforms reward posts that get fast, high engagement, you want to give yours the best chance! Claim your username on all the platforms. You want them all to match! For a long time, I had different usernames on each platform, and this was really confusing to my followers or people trying to find me. I recently changed all of mine to match (although I had to slightly adjust the Twitter name due to character limits). Since then, I've seen faster growth across all platforms.
After posting an image or announcement on one platform, post it on your others!! Remember to format each post for the specific platform, since they all have different design guidelines. You can even link them to each other by posting links.
8. Schedule, Research, Track, and Evolve!
Scheduling and tracking your statistics is another way to grow and stay on top. You can waste a lot of time and energy if you don't know why, what, where or when to post things. Stats help you figure out the most efficient use of each platform.
There are scheduling apps that help take the burden off your daily work load, and here are some good ones, that also include statistics:
Later.com (my favorite, specifically for scheduling Instagram posts)
Tweetdeck (specifically for scheduling posts on Twitter, drawback is it only allows one photo per post)
AgoraPulse (for social media managing - not free, but very powerful)
Hootsuite (for managing all your social media)
Websta (free and helpful for tracking Instagram stats/traffic! - preview below)
Audiense Socialbro (tracking your twitter traffic/demographics)
You can track traffic to your sites with many different apps, but one of the easiest ways is to use Bitly. It lets you shorten a link, which is useful for sharing, and it lets you track statistics about the link traffic. I just started using it and it's super helpful! I've already learned a lot about where my traffic comes from, which helps me know which areas I need to push.
Use your Bitly links anywhere that you share your website, social media, and shop URLs!
For more in-depth statistics, there are sites that go deeper into demographics (a lot of which you need to sign up and pay a premium for anything helpful). You can decide for yourself what is worth it.
As for tracking on Instagram and Facebook, having a business profile automatically comes with some built-in statistics. Twitter has built-in statistics as well (find it in your profile - Analytics)
Almost as important as understanding how to use each platform efficiently, is keeping up with the constant changes!
The teams who run Facebook, Instagram, etc. are constantly seeking ways to improve their platforms and evolve their systems. You have to keep up with their pace. It's not uncommon for a big change to effect how a post performs, or even a drastic formatting change to occur.
9. Summary & Fast Tips
There are many strategies that are the same across all platforms. The main differences come down to the design of each post (since each platform has its own format).
Universal Tips:
Don't take this advice, or any advice, as the only way to do things! There are so many methods to grow your following, and while lots of these tips are universal, you might find a totally different path that works for you. These are meant to help get your started, get you thinking about the options.
Be engaging & Interactive! People use social media to connect, not just get spoon-fed crap. Respond to as much as you can, reply to comments, like/retweet/follow often. Seek out other artists and be genuinely interested.
Visuals, visuals, visuals! On any platform, posts with visuals get more interaction.
Be genuine. Be you.
Don't be spammy or too much like a salesman. Yes, these sites are tools that help you grow your following, but remember there are other humans using them, not just numbers and stats.
Sharing personal stuff is fine on occasion, but don't deviate too much from your purpose. This is your brand and everything you share represents you. If you like the idea of sharing personal stuff and not worrying about what you post, maybe use ONE platform as more of a personal space (for example, I use twitter for both personal and business. I keep Instagram almost all business/art related). As I grow, I will use Instagram exclusively for sharing art.
People crave consistency.

First and foremost this is a VISUAL platform not an informative one. You cannot expect people to read anything you write in your descriptions. Think of it more as an art gallery. When you're walking through an art gallery, do you stop and read every single sign/title/description? If someone reads your description, that is a bonus!
Time of day matters! Post things when your audience is most active (this may take a little testing and research). REMEMBER: The goal is to get instant engagement so your post shows up higher on someone's feed. The faster it is liked/commented on, the more it is seen. It's a cycle!
Use a square crop format
Be consistent with your content and post schedule
Use @ symbols to tag other users or companies/sponsors but don't be spammy. I don't recommend @tagging your peers. I don't recommend using @ in every post.
Use # to include a keyword that people can search for - this is the "search" mechanism for all of Instagram. Use relevant words and don't be too spammy. Use Websta to find the most relevant and popular #'s.
Don't post images with tons of words all over them . It comes across as too salesmany and turns people off. I did an experiment for a month and anytime I posted a photo with words on it, it got waaayyyyyyy less interaction.
Your profile can include 1 URL link. Choose wisely. I often revert to my website here, but sometimes when I share a photo or video I'll link to something specific (like Patreon or Youtube).
You can post videos, but they are restricted to 1 minute in length. Audio is not automatically on for viewers (they have to tap the video to hear it) so don't just rely on audio to convey a message.
Lesson learned: I have trouble driving traffic to my blog and YouTube from Instagram. I think Instagramers don't like clicking out of Instagram. I think it's also because people don't really read the descriptions. Twitter is more helpful for driving traffic to other sites like blog posts.

Posts with visuals get higher interaction. You can include up to 4 images per post. You can also post short videos (1 minute or less), but .gif format works best.
Use @ symbol to link to other users or companies/sponsors but don't be spammy You can also "tag" them in the post.
Use # to include a word that people can search for. This is the search mechanism for all of Twitter.
You are restricted to 140 characters per message
Lesson learned: while my tweets about sale announcements and news get good interaction, more often than not, my tweets about personal stuff and random funny things in my life get way higher interaction. I've come to believe Twitter is good for two things: Spreading news quick, and entertainment.
Your profile is able to contain 1 URL for easy clicks. Choose wisely. Think of who your audience is. For example, almost everyone who follows me on Twitter came from Twitch, so I know they care more about my Twitch art streams than anything else. Therefore my URL leads directly to my Twitch channel.

Post an image, don't fill the description with too much extra stuff. Give it a simple descriptive title and if you must, a very brief description. Use the COMMENTS below the image to post extra information, links to your shop, @tags, etc. (you can format this similar to your Instagram post)
Make sure your About section includes all of you social media sites, your website, and shop URLs. Remember to use your Bitly links for tracking!

YouTube
Videos only
Shorter videos get better interaction and more shares
For the most part, YouTube growth is very slow compared to other social media platforms for artists (this is much different that viral content which spreads like wildfire)
Recommended for artists who do tutorials, sketchbook tours, and time lapse videos
Utilize the platform's design by using the correct video settings, thumbnails, and annotations (there are plenty of videos describing how to do this)
Use descriptive titles. Add keywords in the description
Link to your other sites in the description of your videos (remember to use Bitly links for tracking!)
Watch other successful artists on YouTube and see what they do. They create high quality videos with interesting and helpful content.
Be interactive and answer every comment/question on your videos
Collaborations are super popular, reach out to other artists on YouTube and see if they want to collaborate! Make sure you have something to show them, either your own videos, portfolio, or accounts that show you're a real genuine person! Don't be offended if they don't trust you, after all it is the internet. But stay positive and interactive!
And another shoutout to @Kay Pike Fashion, who spent 12 hours creating those helpful diagrams at the top of this page, telling us everything she knows about social media!!
I personally struggle with social media, as I would much prefer to be painting or hiking than fussing with my phone or computer. But I have slowly realized the value for my business, and more recently started to take it seriously. I have seen much steadier growth since then, which has translated to steadier sales.
I hope this helps :)
Feel free to leave your comments and suggestions below!
069. Urban Sketching & The Fear of the Blank Page
Now that spring has sprung, I find myself giving up my snuggie and slippers for my sneakers and sunglasses.
I grab my sketchbooks, pens, watercolor travel sets, and just go.
Sometimes I don't know where I'm going, and I just walk until I find something that inspires me.
Sometimes I remember a cool building or sunny bench that I want to revisit.
The only constant is that I want to paint.
There is a huge difference in painting from a reference photo vs. painting from life. When you paint from a reference photo, everything is already flattened conveniently to a 2D surface that you can copy.
From life, your eye must decipher the depth, understand the shadows and highlights as the sun dances over the grass or through the tree limbs. This carries an added challenge, when you're trying to capture the scale, perspective, and colors of what you see! However, with just a little practice, it becomes much easier, and far more rewarding.
In my previous post I shared my Plein Air sketchbook tour, and talked about how meaningful the experiences were when I was painting.
Besides, there's nothing like a change in environment to get out of an artist block or a creative funk.
Time and time again, I find myself craving a good sketch/paint session, but have no clue what I want to make! So rather than fuss over it or overthink it, I simply GO!
Seriously, I just throw everything in my bag and leave my house.
This creates momentum. That momentum steamrolls any of my doubts or fears, and from there, its no longer about "I feel like sketching but I don't want to ruin my sketchbook or I don't know what to paint" and it becomes "where can I sit and start sketching?"
It may seem so simple and obvious, but that is the difference between a stack of blank sketchbooks and ones full of stories, experiences, and adventures!
Plein air painting/urban sketching has become as much a part of my work flow as answering emails.
This weekend I'm headed out into the Scottish highlands for a camping trip!
I ordered a GoPro so I can eliminate the tedious and inefficient process of filming my plein air sketching with my phone. Hopefully it arrives in time so I can test it out this weekend. I'm definitely planning on bringing my sketchbook and paint!
063. Documenting Artwork
Documenting your work is so important, whether you are a hobbyist or a full time artist. You use images for your portfolio, shop, and social media. Having consistently good images will put you and your work in a better light (pun)!
For those of us who are trying to build our business and make a living through our artwork, it's essential that we make it look as professional as possible!

First, decide between using a camera to capture your work or a scanner.
For me, that was an easy choice. I come from a photography background, so I already had the knowledge and camera required for good photos. But even more importantly, I often paint very large - sometimes up to 4 feet paintings, and those cannot be scanned!
If you want to scan your artwork, but you don't own a large scanner, you'll need to find a local print shop who can scan large artwork, and they have limits (and it can be pricey).
So this information is for anyone interested in photographing your artwork. This is MY process, and it may differ from other artists, but I hope it helps! Everything in my portfolio was a photo taken with my DSLR and cropped/adjusted in Photoshop after.
Anytime I say "canvas" I am referring to your artwork, whether it's a painting, drawing, or sculpture!
Lighting
There are lots of factors to consider when documenting artwork, but lighting is the main challenge. Regardless of your equipment, if you don't understand what good lighting is, your photos will suffer.
USE NATURAL LIGHT WHENEVER POSSIBLE (But not direct sun)
Each type of light (natural, incandescent, LED, fluorescent, etc) has a different color or "temperature" (warm vs. cool)
Natural light falls in the middle, giving you a very neutral color and most accurately representing your artwork's colors.
Most of us have incandescent or warm LED bulbs in our home, which will cast a warm glow. If you absolutely cannot take photos using natural light, using the artificial light available to you is OK because color can be fixed in post production (to an extent). However what is not OK is low light, or using flashes that create a glare on the artwork. Sometimes, the glare isn't just a white reflection, but a color shift within your shadows. This can be hard to notice until you get into post production, and it's really annoying to fix!
To avoid reflections and glare on your canvas, you need to use indirect lighting. This means making sure there are no direct sources of light hitting your canvas. You can do this by angling your canvas in a certain position with your room. Fill the room with as much light as possible. Don't point light directly at your canvas. Begin angling the canvas and really look at the shadows. If you notice they are "lighter" than they should be or have a slightly different color, this means there's a glare and it WILL show up in your photos.
Keep angling until you find a position that works! Remember to avoid casting a shadow on the work from your body, camera or tripod (I rarely use a tripod).
The angle of the photo matters!
Don't take the photo from a harsh angle (from the side). Position the camera DIRECTLY ABOVE the canvas, keeping in mind that you will need to crop the image. Cropping requires straight lines.
The following examples were taken with my phone (LG G4):
Final image after adjustments.
The last image shows what it looks like after being cropped and the contrast slightly increased.
This painting was not complete at the time, but I wanted to use it as an example because it had a variety of colors, contrast, and texture. These things were captured well with my phone and the final image is perfect for twitter or instagram, or even an online portfolio!
DSLR Camera Settings
I always shoot in RAW format (not jpeg) whenever possible.
Most cameras, even point-and-shoots and some phones, have the option to change what file type your images are. RAW format allows you to adjust native settings of the image like exposure, white balance (color), and much more in post production, and it gives you a higher quality image.
Canon: In your camera menu, scroll to the "Image Quality" function and choose RAW.
Nikon: In your camera menu, scroll to "Image Quality" function and choose NEF (RAW).
Keep in mind this will increase your file size, sometimes up to 30mb per image. However it provides the purest, largest, highest quality image, which will allow you to make large poster size prints of your images later if you want!
If you don't have the option for RAW, use the highest jpeg setting available.
Use a high ISO in order to allow as much light into the sensor as possible. If your shadows are "grainy" that means you need more light in the room and a lower ISO (increasing the ISO too much will cause grain).
MAKE SURE THE PHOTO IS IN FOCUS! Stay as still as possible, and take the image directly from above so that every part of the canvas is in focus.
Using a Phone
I have the LG G4 phone, and I chose it specifically for the camera. It allows manual settings as well as RAW format! It takes incredibly crisp images and does a great job handling low light.
You can take perfectly decent photos for your portfolio and social media with your camera phone.
(See above examples)
The area that it lacks is usually resolution/file size. If you plan on selling high quality prints of your work down the line, you'll need very high resolution, large files which phones don't always provide. Just keep that in mind.
Post Production
After you take the photo, you will need to make adjustments and crop the image to match the borders of your artwork.
I use Photoshop CS6, but you can find other photo editing software out there. Just make sure it allows you to edit RAW images if you use that setting.
When you open a RAW file, it will first open in Adobe Bridge. This allows you to adjust the native settings of the image like exposure and color. If you have a jpeg, open it directly in Photoshop or whatever software you have. You can still adjust these settings in a jpeg to an extent.
The main things I do are:
- Crop
- Adjust saturation or colors
- Adjust contrast (using levels or curves)
Social Media
Like I mentioned before, a lot of times using a phone to capture images of your work for social media is perfectly fine, just try to keep lighting, angle, and quality in mind! The more you post consistently good quality images, the more your work will attract others. Posting poorly lit, horribly yellow, or grainy photos of your work just makes the art and your brand look BAD! Give yourself the best chance possible by taking a little extra time and pay attention to the details.
Progress Pics are an excellent way to show off the unique aspects of a medium, whether it's painting or drawing, or whatever! People love progress pics!
Instagram currently offers the choice to upload multiple images to one post, so you can show individual progress photos or closeups of your piece.
Note: For the multiple photo feature, the app auto-crops them to a square, so make sure you take the image from far enough away/the correct angle to fit within a square.
Twitter allows you to upload 4 images at a time, which is also an excellent way to show details or progress shots.
You can also have fun and get creative with your compositions.
Multiples or closeups don't have to be boring!
If you have any specific questions, please message me or leave a comment below! I'd love to help you reach a level of quality you are proud of!
062. Overwhelmed - Life update
Sometimes being overwhelmed makes you feel very isolated. In this post I talk about my experience.
Read More059. Artistic Progression
You know that feeling when you're starting to learn a new skill, and even though you understand the premise of how to execute the skill, your body just can't quite do it?
For instance, shooting a bow. You understand you must raise the bow, aim the arrow, pull back on the string, and release. You hope it hits the target in the desired spot. However, you quickly realize there are so many tiny nuances to achieving your goal. Angle, strength, even wind can factor in to the outcome. It cannot be perfected without hundreds - if not thousands - hours of practice.
The same goes for art.
Learning how to manipulate paint on a canvas, or how to sweep graphite over the paper to a desired outcome is a skill.
It's not an innate talent you are born with. With enough hours and dedication, you can learn how to paint something like this:
"The Fellowship of the Ring - Descent from Caradhras" by Donato Giancola (oil on linen)
It may be a long and sometimes tedious and frustrating process. However that doesn't mean it's not an enjoyable process! It's going to be filled with tiny failures and successes.
Remember: mistakes are your FRIEND!
We learn from our mistakes.
I frequently hear new artists say "it feels like I'm not getting any better."
If you are practicing, especially daily, you ARE getting better. Your progression may not be noticeable (to you) because you have an idea of what skill level you want to reach, and that is clouding your judgement.
If you truly want to make progress, you need to take an active role in your progression! This means that every single time you draw/paint something, you give it a proper look and do a quick "lessons learned" session. What is good about it? What is not good? Where do you feel like you struggle the most?
The more you do this, the more you'll be present during the creation, and be able to see your true mistakes, learn from them, and eventually get over them.
It doesn't happen immediately, but it will happen.
No matter what, don't compare yourself to other artists. That will only lead to that pitiful "I will never be able to do that" feeling. I'm just as guilty of this - but once I'm aware that I am doing it, I snap out of it and continue on my own journey.
Do you have any tips/advice for new artists? If so feel free to leave them in the comments!
053. Artist Advice: Shipping Artwork
If you plan on selling physical artwork, you'll need to familiarize yourself with some supplies. I'll talk about the different types of packaging needed for different types of art!
Small Flat Artwork
- Rigid Envelopes
I stay stocked up on size A2 (13.25 x 9.25" because my most popular painting size is 9"x12"
They fit perfectly in these envelopes! - I buy mine in bulk on Amazon so they cost less than $1.20 each (free delivery)
Thick Artwork (framed work & canvas)
- There are many ways you can package your thicker work, but over time I discovered the most cost-effective way is to build my own boxes.
- I start off with large "mirror boxes" and cut them down to the size I need.
- If you buy them in bulk, they should cost $5 or less each. And depending on the size of item you're shipping, you may be able to make two shipments out of one large box.
- The mirror boxes I use are telescopic double-walled cardboard, so they are extremely rigid and protect anything inside.
- I also buy bulk bubble wrap and packing paper for extra padding.
- Here's a video showing my process for boxing larger items:
This video is from last year, and I've started using thicker boxes & added more padding (bubble wrap) to this process, but you get the idea!
The largest painting I've ever shipped was 2ft x 4ft, and I shipped it from Colorado to UK using this method. It cost $150 for 3 day Priority Express, Tracked, Insured mail.
Cost of Shipping - Domestic within US
- Depending on the size of your art, you can save money by shipping Priority. If you ship flat artwork smaller than 12" on it's longest edge, you can use Priority envelopes and ship within the US for about $6.50 - Tracked & Insured
This is a great option if you want that guaranteed service. - For large artwork in thicker packages/boxes, expect to pay minimum $50 per shipment. This will include insurance, tracking, and guaranteed delivery (which your clients will expect). For canvas, my average cost within the US was $60.
Cost of Shipping - International
- If you're shipping from within the US, to another country, the prices rise drastically.
- For Priority and generic 12" envelopes, to most countries, you'll pay about $30 (Insured up to $50, but only tracked to the US border)
- For larger packages/boxes you have a couple options. I ALWAYS ship Priority Express international because the risk of the item getting delayed or damaged is higher.
This costs about $80-150 to most countries (depending on size/weight of box).
This should be paid by the client. - If you're shipping from EU to a foreign country, the price is slightly better, especially for smaller flat artwork in rigid envelopes (anywhere from $10-30).
For larger packages/boxes within the EU expect to pay $50-100 (depending on size/weight of box)
Customs Forms
- If you're shipping from the US to another country, you'll need to fill out a customs form for anything larger than a regular letter envelope. Such a pain!
- The USPS Recently changed their customs forms so that all size packages use the same one (easier!). Grab a handful next time you're at the post office and fill them out ahead of time.
- If you're shipping International Express, you need to get the customs form with the Express Mail EMS logo on it! Ask the clerk for these
- Fill out the information as requested on the form, sign & date it.
- If you're shipping from within the EU to an EU country, most times you won't need a customs form, unless it's a larger package, going outside the EU. Yay!
Personal Advice
I've shipped over 150 packages, most of them international.
I've only had ONE incident where a canvas was damaged during shipment (from Colorado to Denmark). There was a giant hole in the box and corner of the frame was broken, the canvas was slightly torn. My client was super OK with it, because he ended up framing it under glass, which flattened the canvas and you couldn't see the tear. I still refunded the shipping.
Besides that one incident, I've never had anything get damaged during shipping.
I still buy insurance for all my packages, just in case. It's all worked into the cost of shipping that the client pays.
It's a necessary precaution, in my opinion!
If you have any advice or stories of your own, please share them in the comments below!
051. Advice for Artists: Work Flow
One of the hardest things about being a freelance artist is time management.
When you can set your own schedule, it's easy to procrastinate on some things and feel overwhelmed when a deadline approaches.

It's also easy to get overwhelmed by the sheer amount of "background" work that goes into running your own business.
It's not just painting.
It's not just streaming.
It's conceptualizing interesting paintings, sketching, prepping canvas, keeping supply levels up, networking, social media, taking photos of work (or scanning), updating website and portfolios, answering emails, discussing projects with clients, packing and shipping sold artwork...
And that doesn't even include the time I'm streaming, all the admin that goes into streaming full time, collaborations, working on this Blog and keeping up with my Patreon!
So how the heck do you stay organized and on time in the midst of a to-do list the size of your arm?
Part of the fire that drives me comes from the fact that I've ALWAYS wanted to do this with my life. Now that I have this opportunity, I will do anything in my power to keep it going.
That said, I still get burned out.
Having a balance of work & play is really important. For me, it's having at least one day a week where the majority of the day is spent out of my studio doing something fun - mainly hiking and painting outside.
Without that room to breathe, the work load can suffocate me and my creative fire goes out. When I'm overwhelmed, I'm in a terrible mindset for creative work. I learned the hard way that I NEED to have "time off." It's just part of my business.
Secondly, having a consistent work flow is paramount. Without it, chaos reigns. When chaos reigns, productivity, and therefore income, suffers.
My work flow looks something like this:
Commissions
- Receive commission request.
- Respond with pricing and ideas.
- Agree on pricing and idea, send invoice for 1/2 the total amount.
- Once payment is received, start painting.
- Once painting is complete, send preview photos to client.
- Upon approval, send invoice for remaining amount due, plus shipping
- Take high-resolution image of painting for archive.
- Upon final payment, package and ship painting.
- Send tracking info to client.
- Close/archive email.
Sales (Paintings/drawings that I make for fun/personal projects)
- Paint.
- Take high resolution images of final piece.
- Upload to Etsy and publish the listing.
- "Advertise" on social media (not spamming, just once, and repeat a month later if it hasn't sold)
- If someone purchases it, package and ship immediately.
Patreon (two main events each month - the Paintalong, and shipping rewards)
- Choose a date for the next Paintalong.
- Advertise on social media once a week leading up to it.
- Do Paintalong live on stream.
- Collect photos of everyone's work (like herding cats).
- Make final collage of everyone's work.
- Edit and upload video for my Patreons
- Once a month - paint, package, and ship Patreon rewards (this usually takes 3 full days)
Streaming M/W/F/Su
Admin Days T/Th (get LOTS of work done!)

Since I stream full-time, most of my work is created during a stream. So part of my workflow is streaming itself. I make sure I am productive during a stream. I would love to just hang out and chat more with my viewers, but that would mean I wouldn't ever complete my work!
After each stream, I take a photo of what I've completed and share it on social media.
Then the next morning when the sun is out and my studio is full of light, I take a high resolution photo of the finished work for my archives. I always use natural, ambient light when documenting my work.
I hope some of this helps! Your own work flow might be different, but the most important thing is consistency!
If you have any tips or advice, feel free to share it in a comment below!
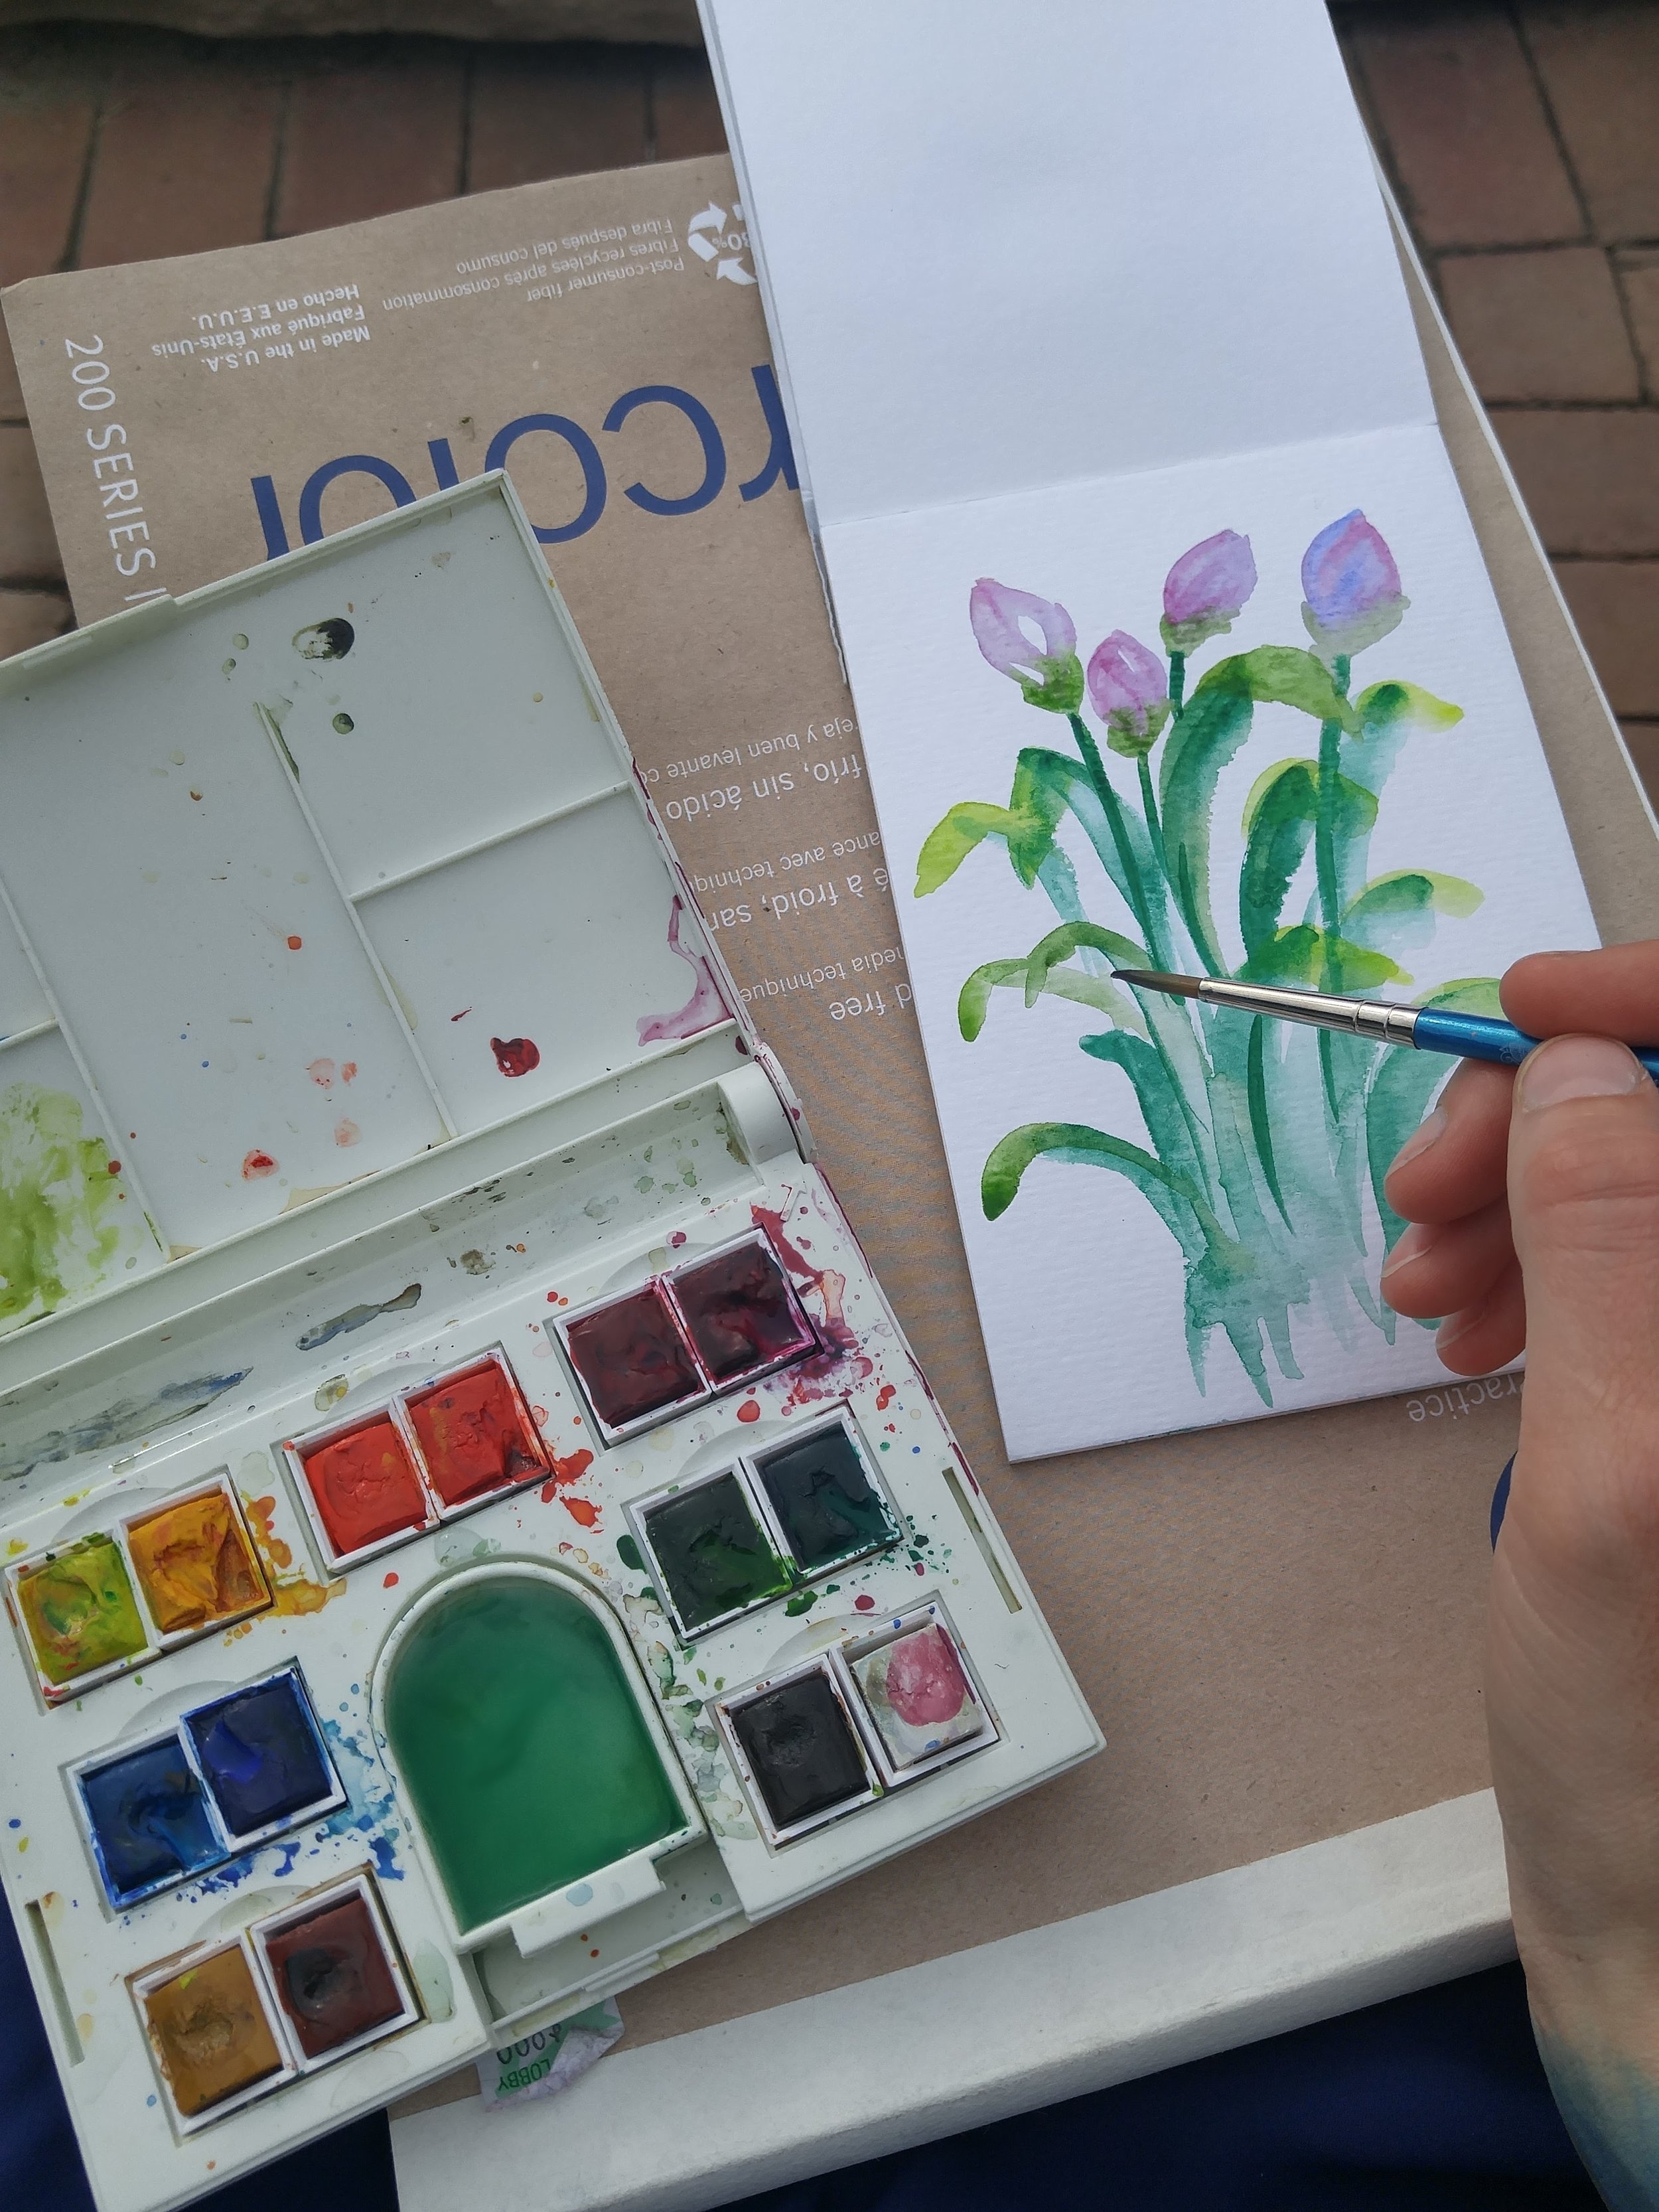
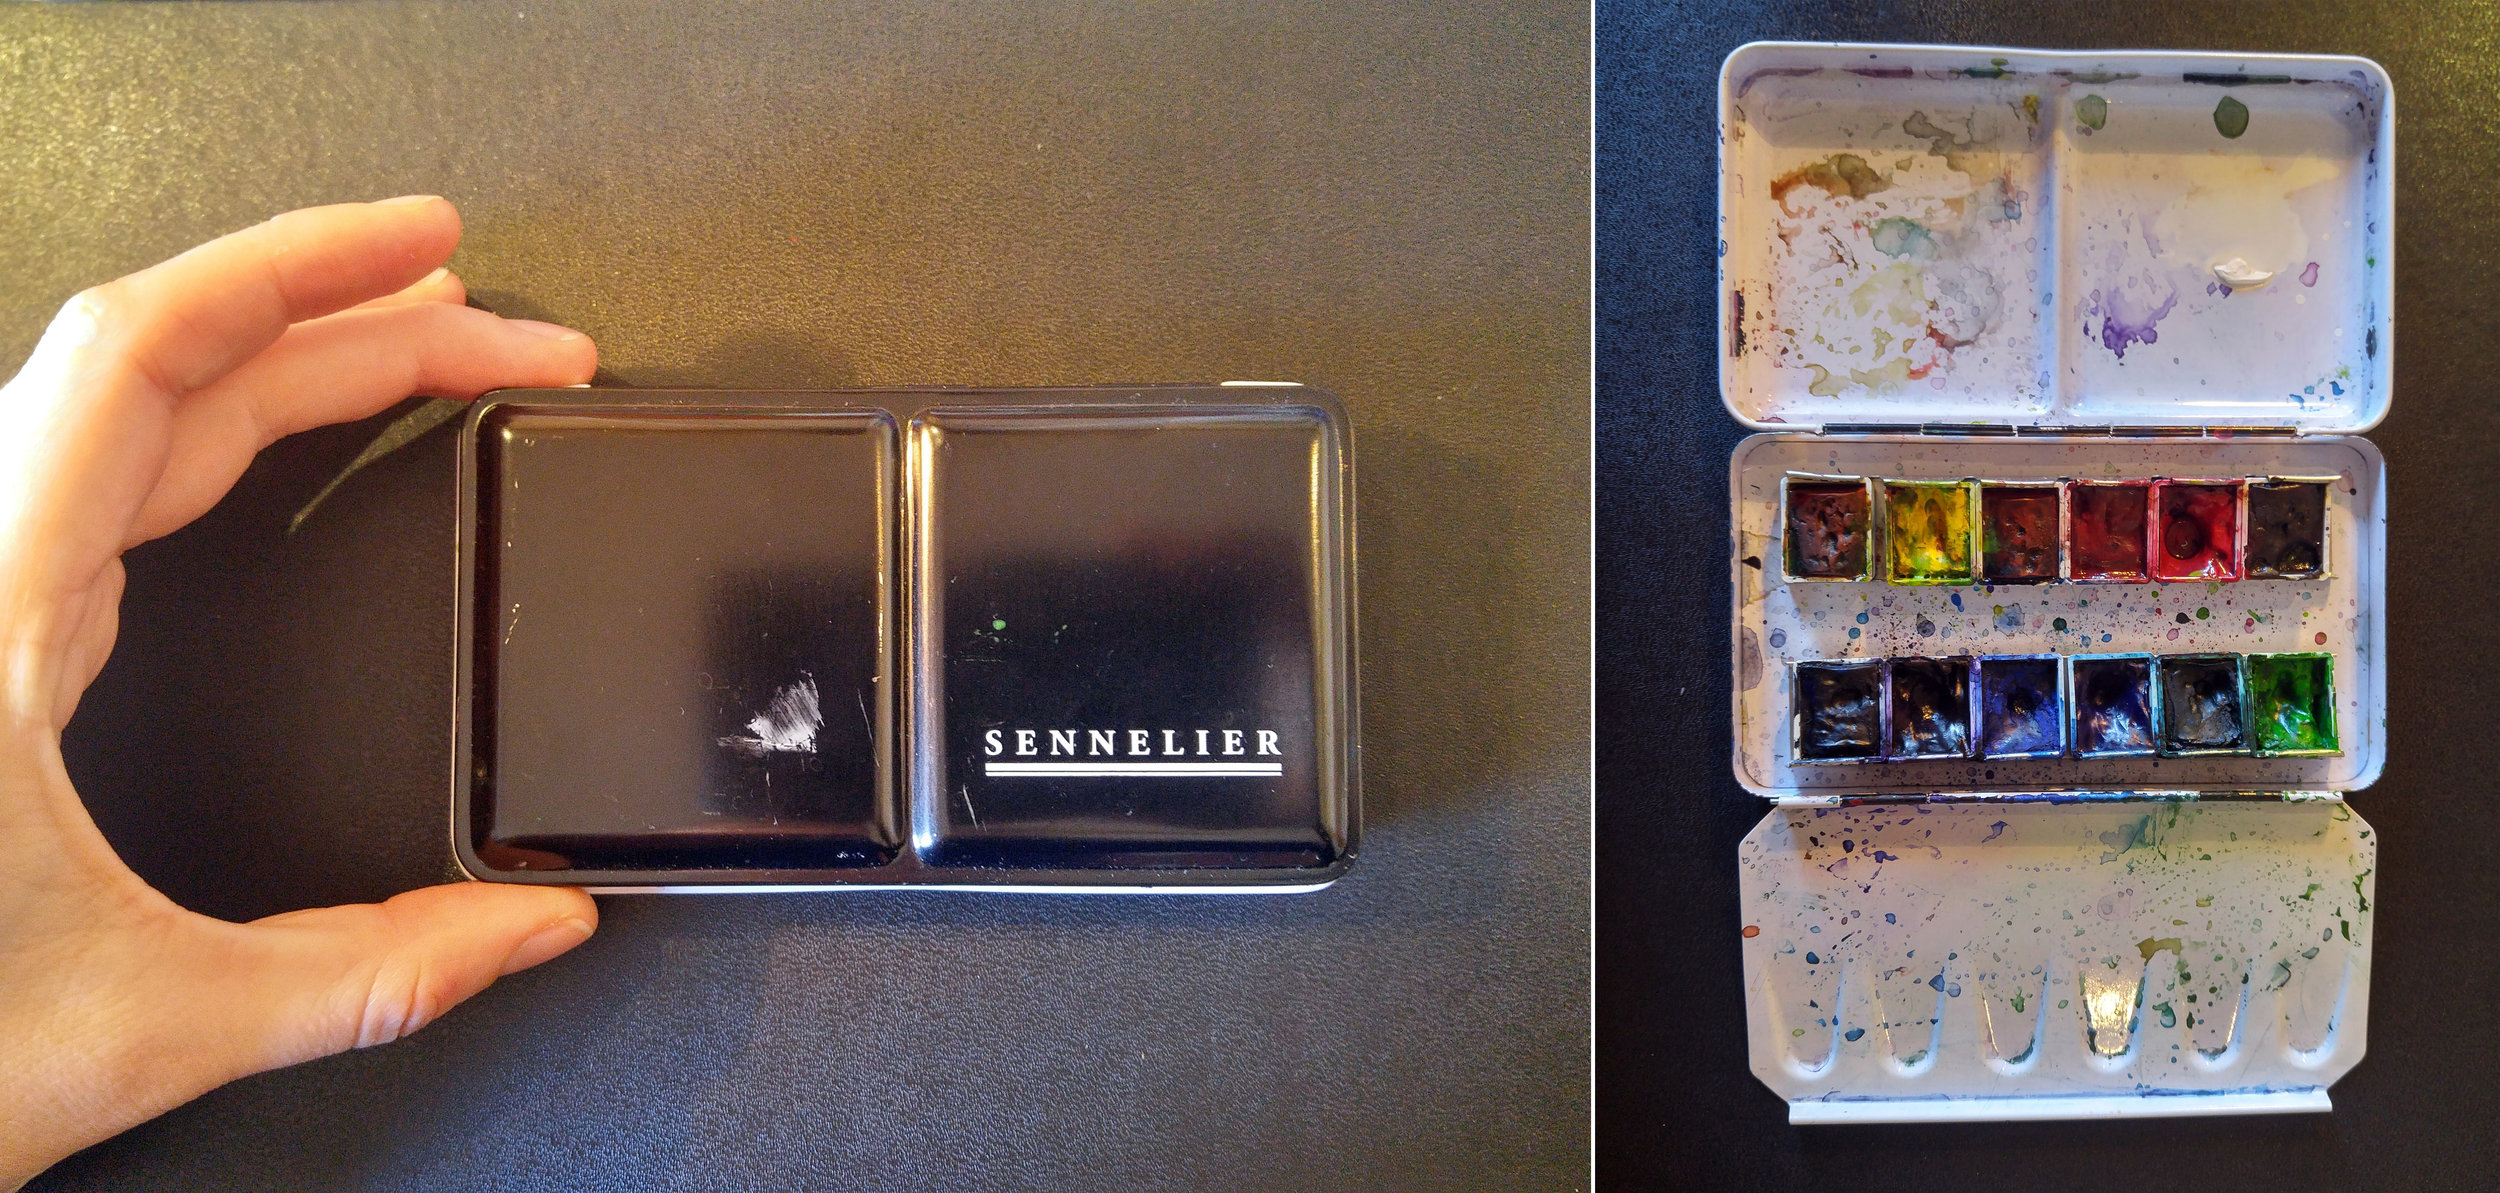
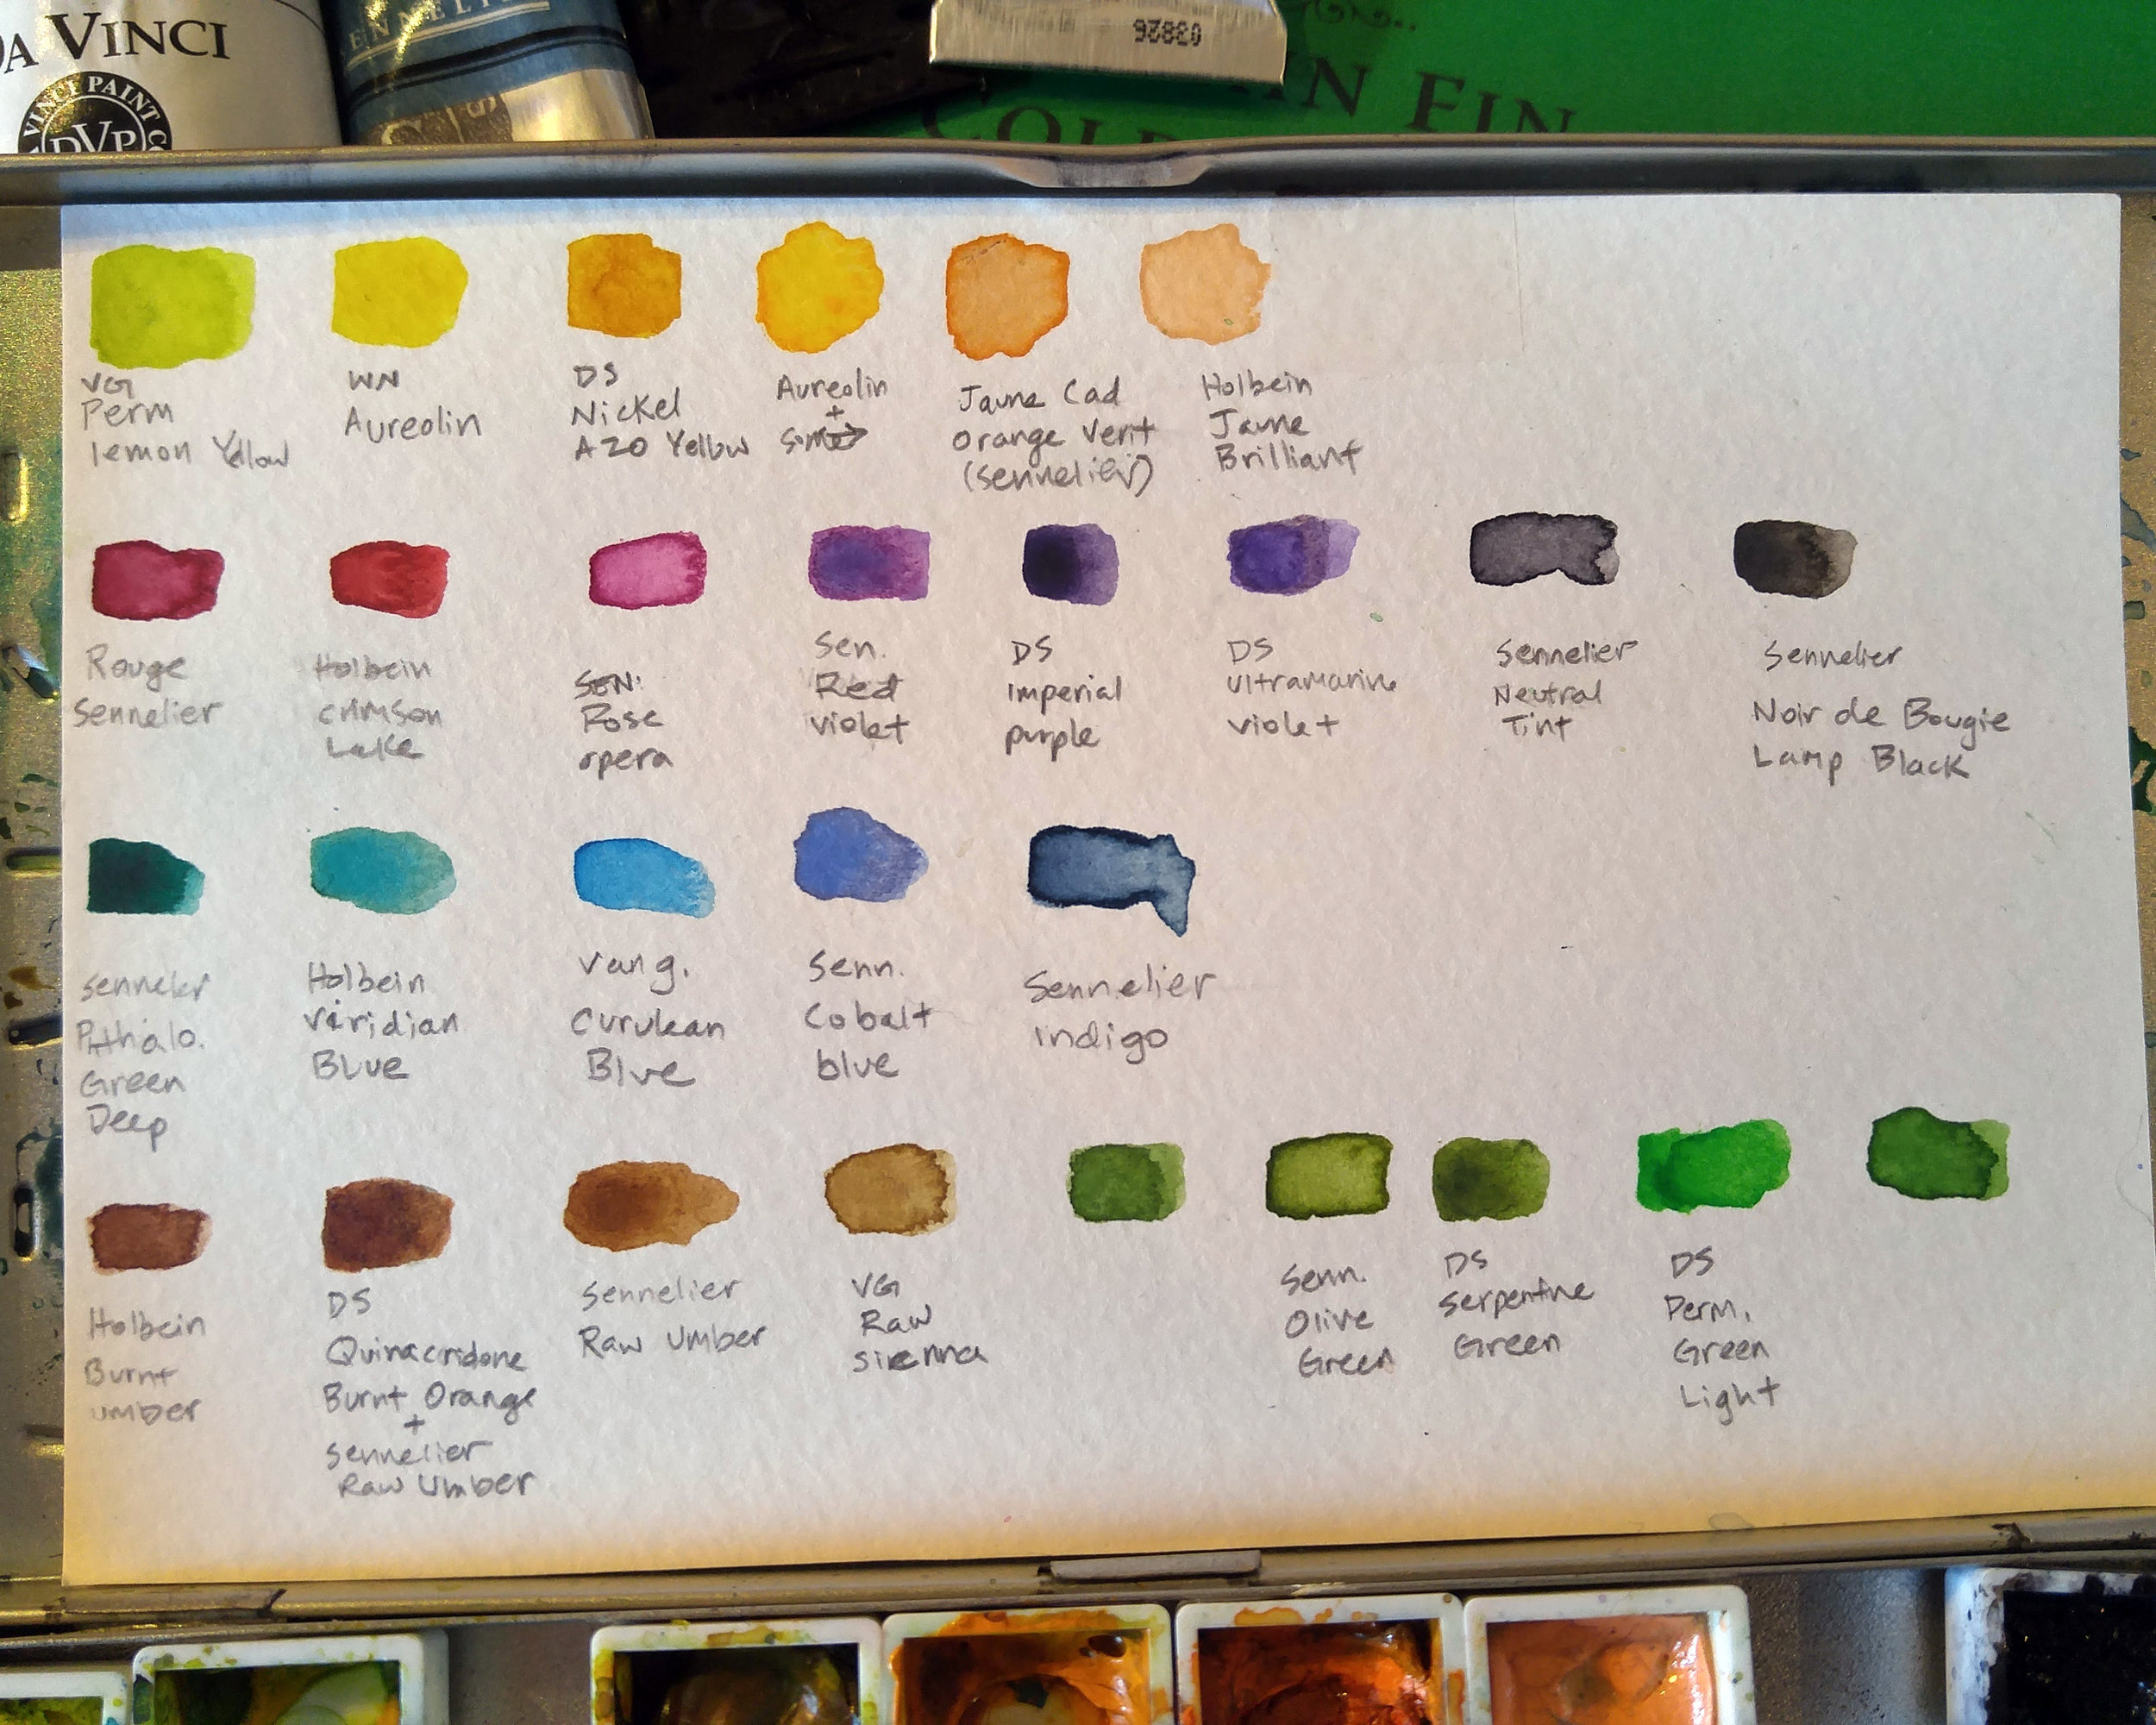
046. Beginning Watercolor: Choosing Your Palette
While I'm streaming, I get so many questions about what paints and colors I'm using, so I figured I would write a little about it.
Why do you choose one brand over another? What colors should you get?
What kind of containers do you need?
Brushes and paper are a whole other topic - so I'll discuss that another time!
Disclaimer: I'm not a trained expert in watercolor chemistry and I haven't tried every brand of paint out there. This is all based on my personal experience with watercolor. I am not sponsored by anyone, and I don't get paid to say any of this.
First, let me explain one very important thing:
The only difference between the wet tube paint and "dried" colors that you see above is that one is wet and one is dry. That's it.
Wet tube paint: immediately ready for use, just dip your brush in.
Dried paint in the half pans (those little white square holders): Needs a drop of water to "activate"/be used.
(If you're in a hurry and don't want to read my individual experience with certain sets/brands, skip to the bottom for the abridged version!)
1. Travel/Compact Sets
When I first started my adventures in watercolor, I had a very specific desire to be able to paint outside while I was hiking and camping. Therefore I knew I needed a portable palette.
I knew nothing about brand or quality at the time so I randomly chose the Winsor & Newton Cotman Compact Set.
It cost about $20 at my local art store, and included 14 colors.
It was the perfect intro into watercolors! I wasn't worried about which colors to buy, or if this was the "right set for beginners" - I just dove in!
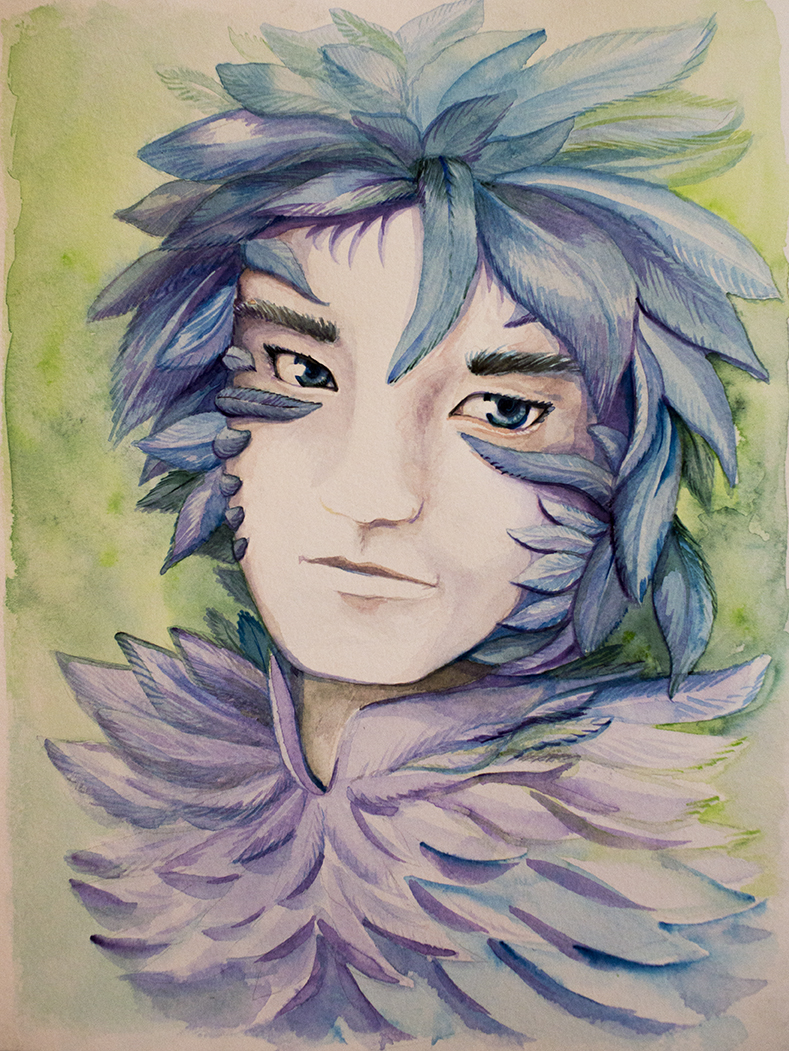
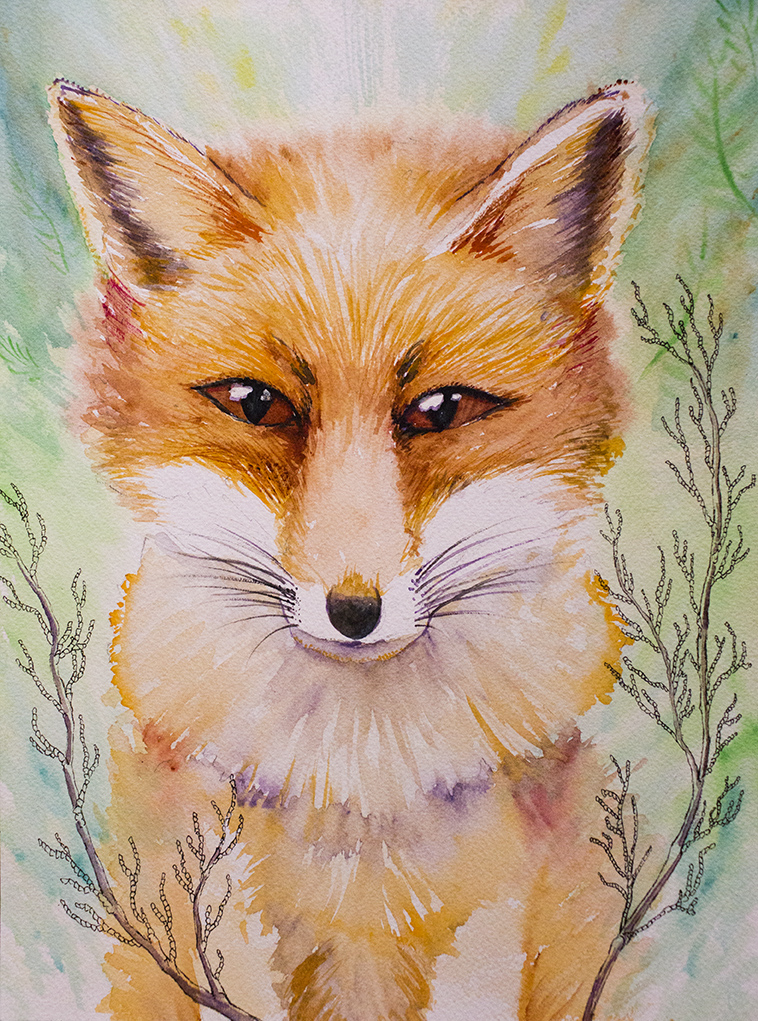
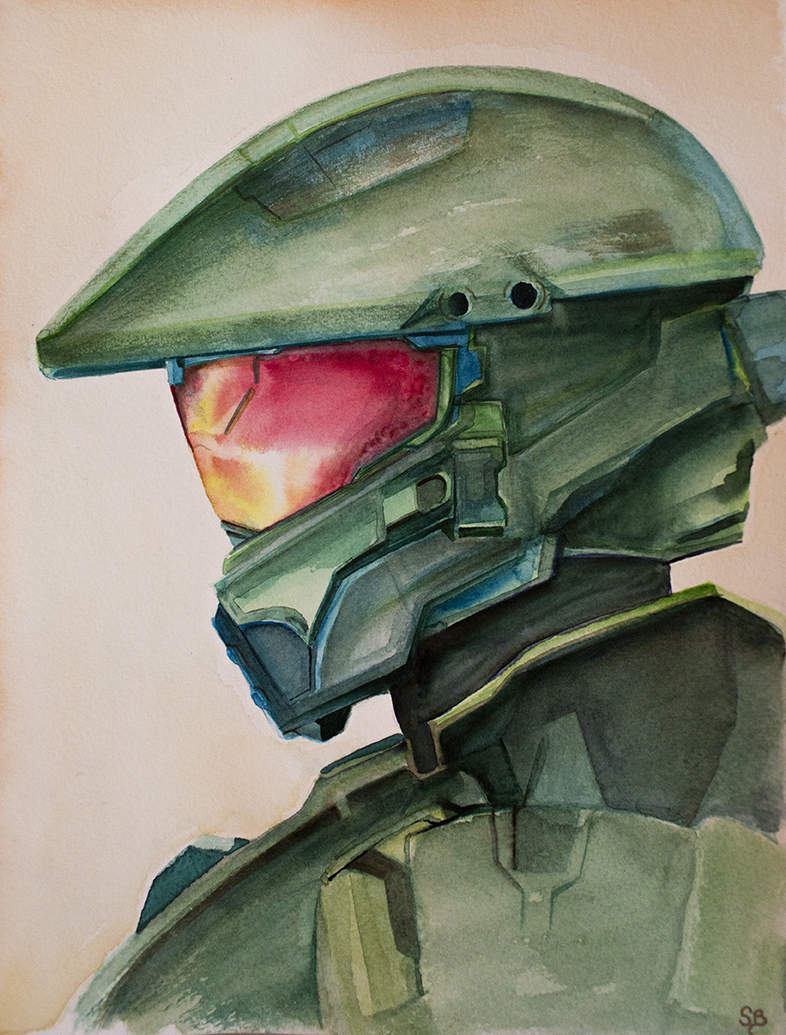
Here are a few pieces I created with this first set (some were done outside, some were done in my studio):


However, after a month or so, I was noticing how difficult it was to get extremely saturated/deep colors out of this set. I also wanted to try some new colors.
Time for an upgrade!
I did a little searching, and I found this Sennelier La Petit Aquarelle 12 Half Pan Set for $20 that had fewer, but slightly different colors and room to add more.
At this time I was becoming completely obsessed with watercolors and I wanted to start a serious study routine. I bought this small Moleskin Watercolor Sketchbook (still my favorite!) and decided that every single day I would paint for at least one hour.
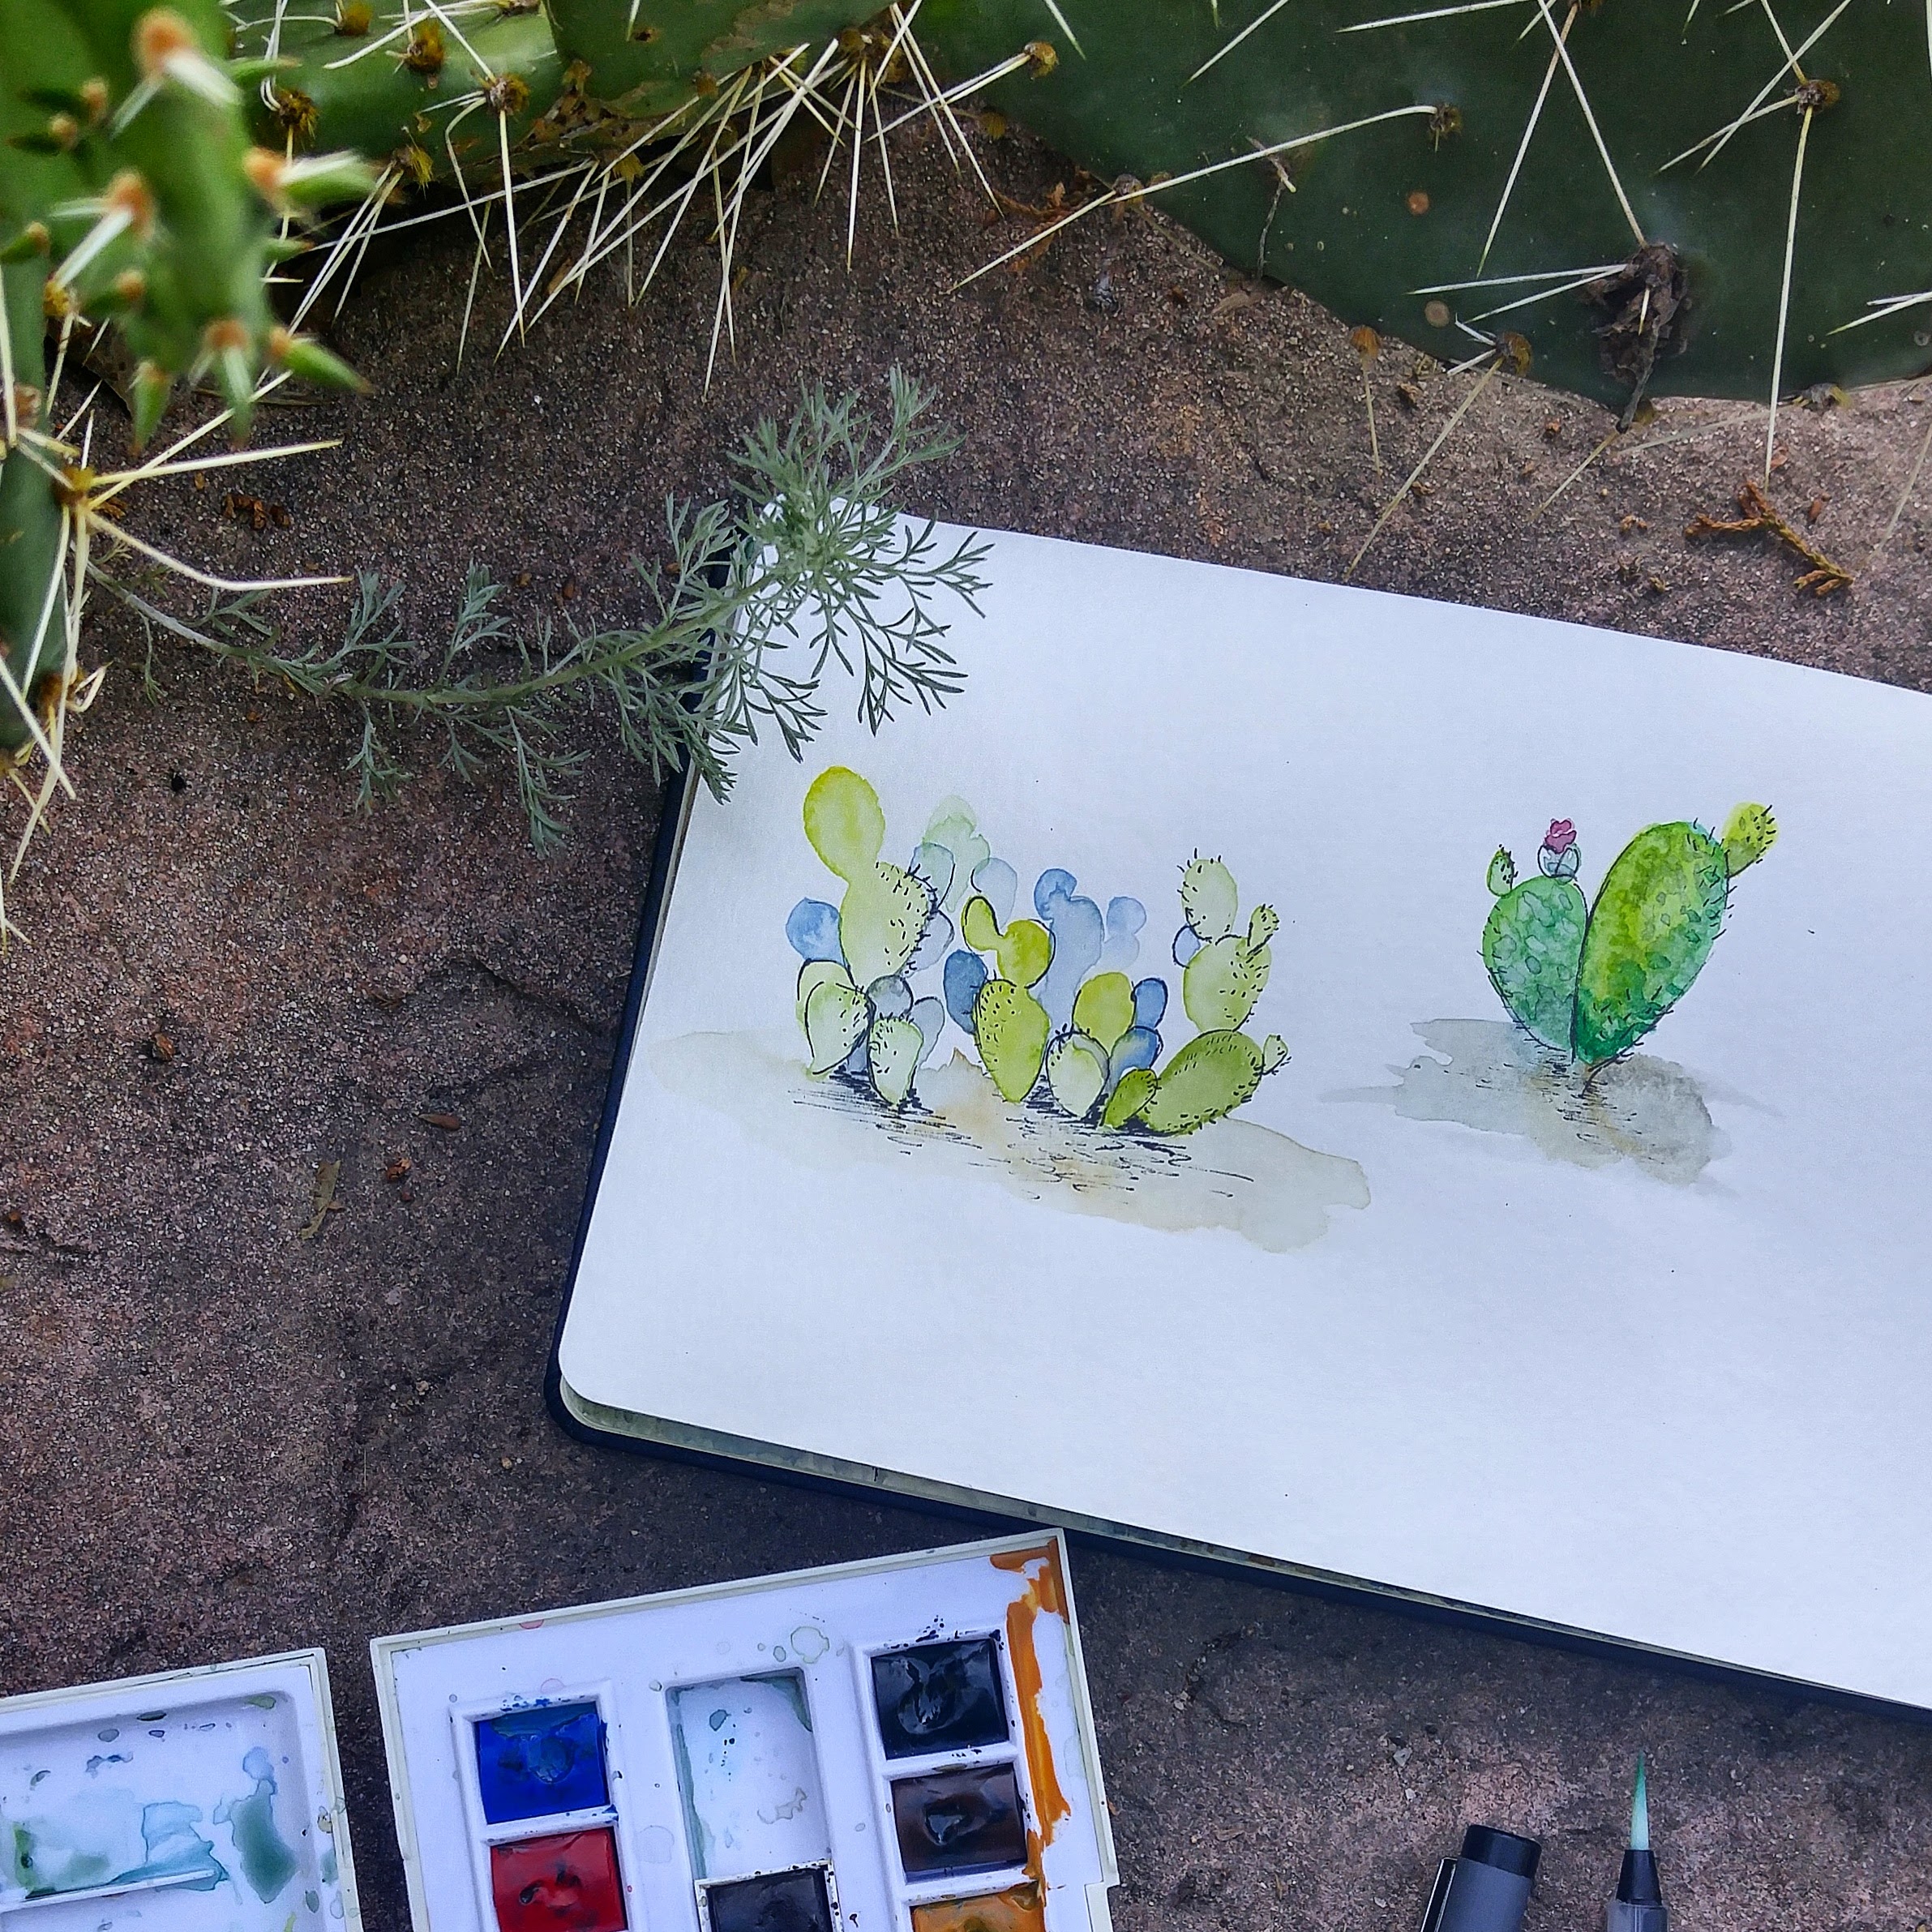
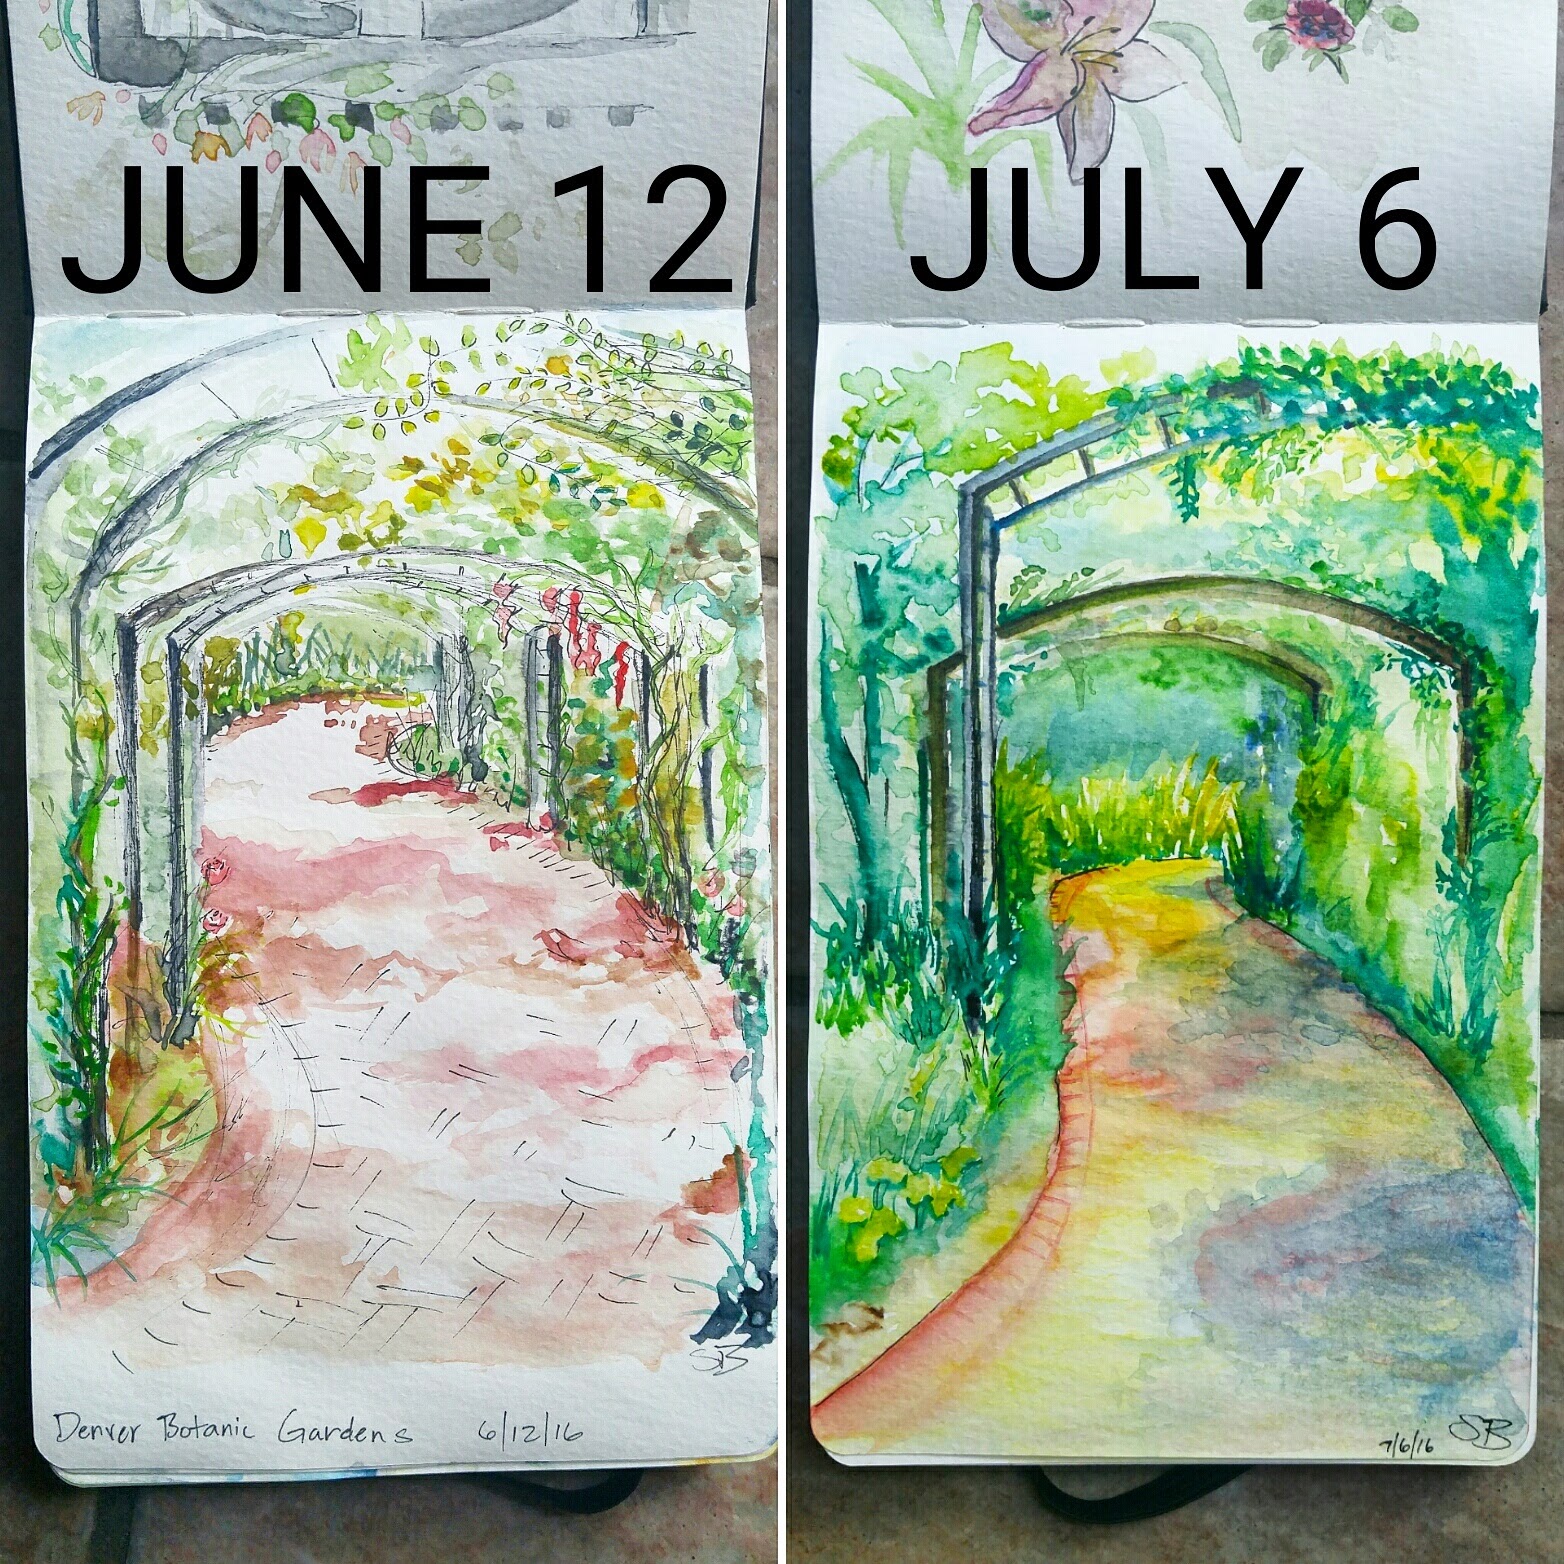
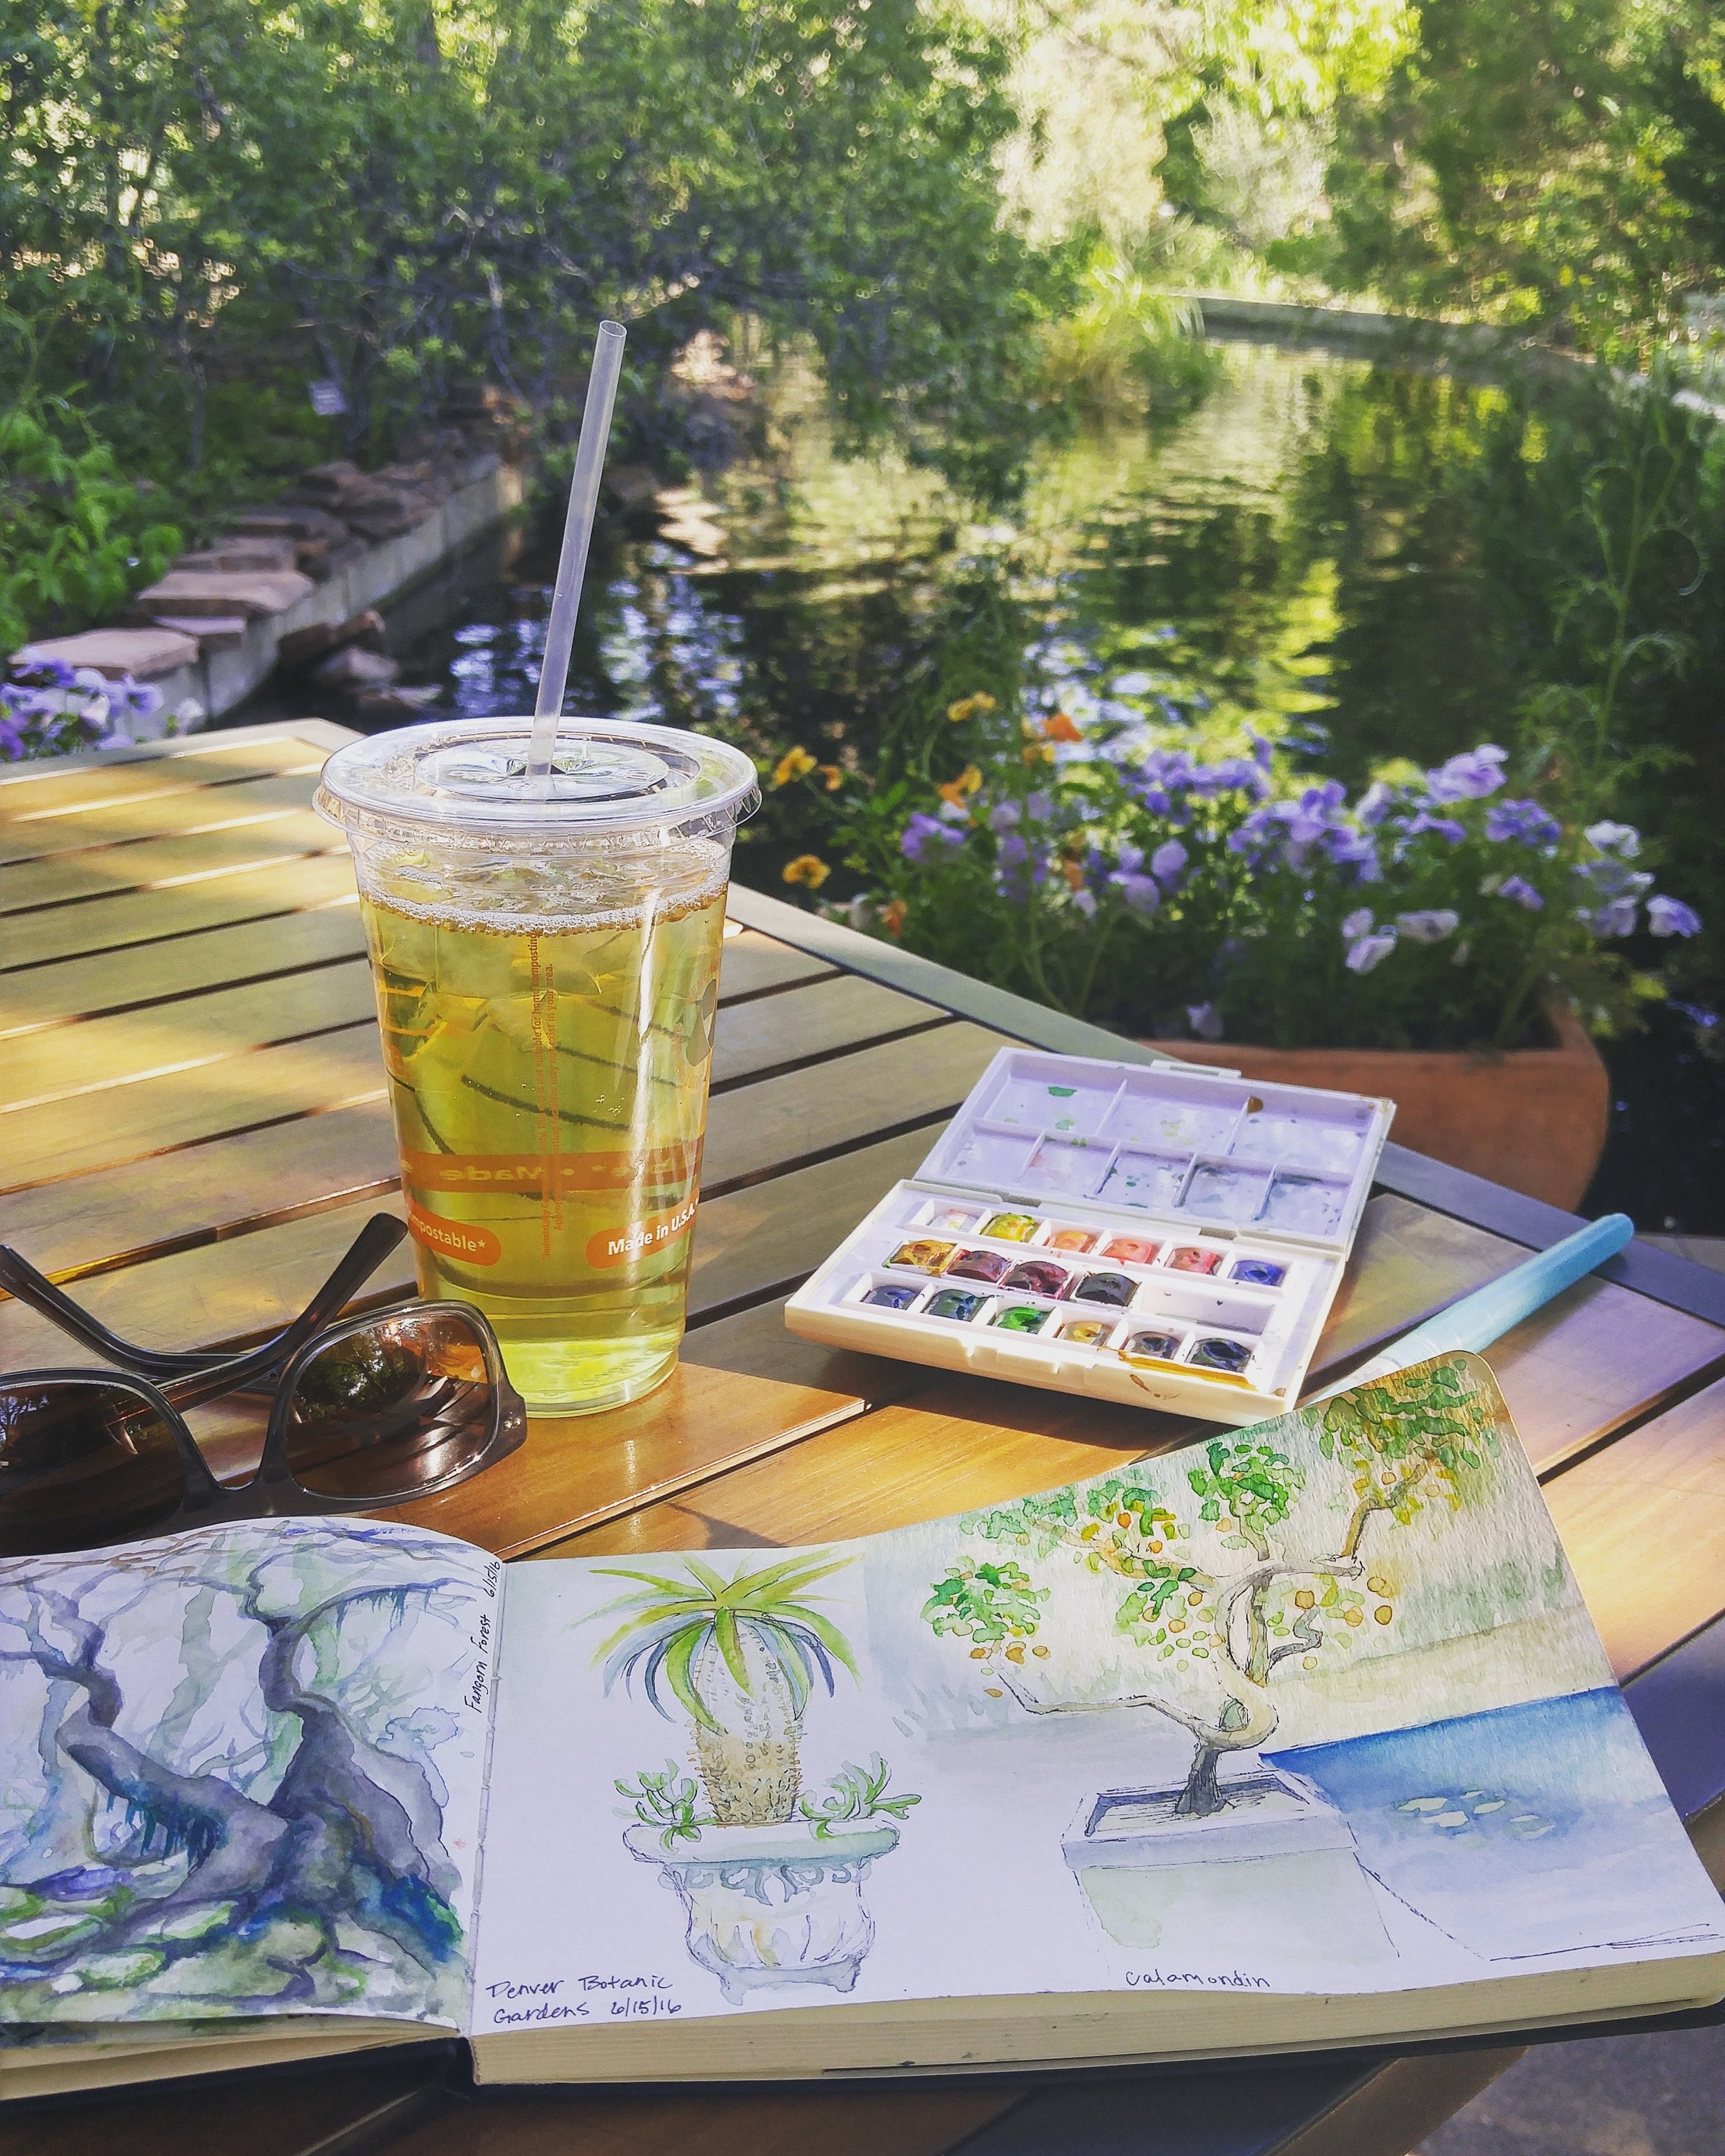
Most days I ended up painting for 3-4 hours. I loved going to the Denver Botanic Gardens and doing plein air studies (painting outside).
This Sennelier set had new colors, and the paints themselves were much more saturated/deep. With just a touch of water, I got extremely rich colors!
Here are some things I painted with this set:

I quickly fell in love with Sennelier.
I saw first hand what a difference the quality of the paints made.
The W&N Cotman colors are considered "low" grade paints, good for entry-level/beginner painting. And that's exactly the experience I had. They were cheap and got me started.
Sennelier are considered "Artist" grade paints - high quality. And that's exactly the experience I had. I ended up buying another little Sennelier travel set that had a couple more color options. It was tiny and perfect!
By the way, Winsor & Newton also make Artist grade paints, and they are wonderful! I'll get to that later.
2. Custom Palette
So, I was having a blast with my travel sets, but I still wanted more. I was painting so frequently, both in and out of the studio, and starting to notice how limited I was with color. I noticed my limited color palette was leading me into painting a specific "look," and I wanted to have more freedom of choice.
So I decided to take the plunge and buy some tube paints!
I went to my local art store with my business credit card and an open mind (not always the wisest decision). The people who worked there are extremely knowledgeable about the products, and are artists themselves who USE the products. They also have a little area where you can try things.
After about 2 hours of talking and experimenting, I ended up buying $300 worth of Sennelier and Daniel Smith tubes.
The color choices were amazing... of course I wanted everything, but still had a budget. Both Sennelier and Daniel Smith are extremely high quality paints, and you can FEEL the difference when you use them.

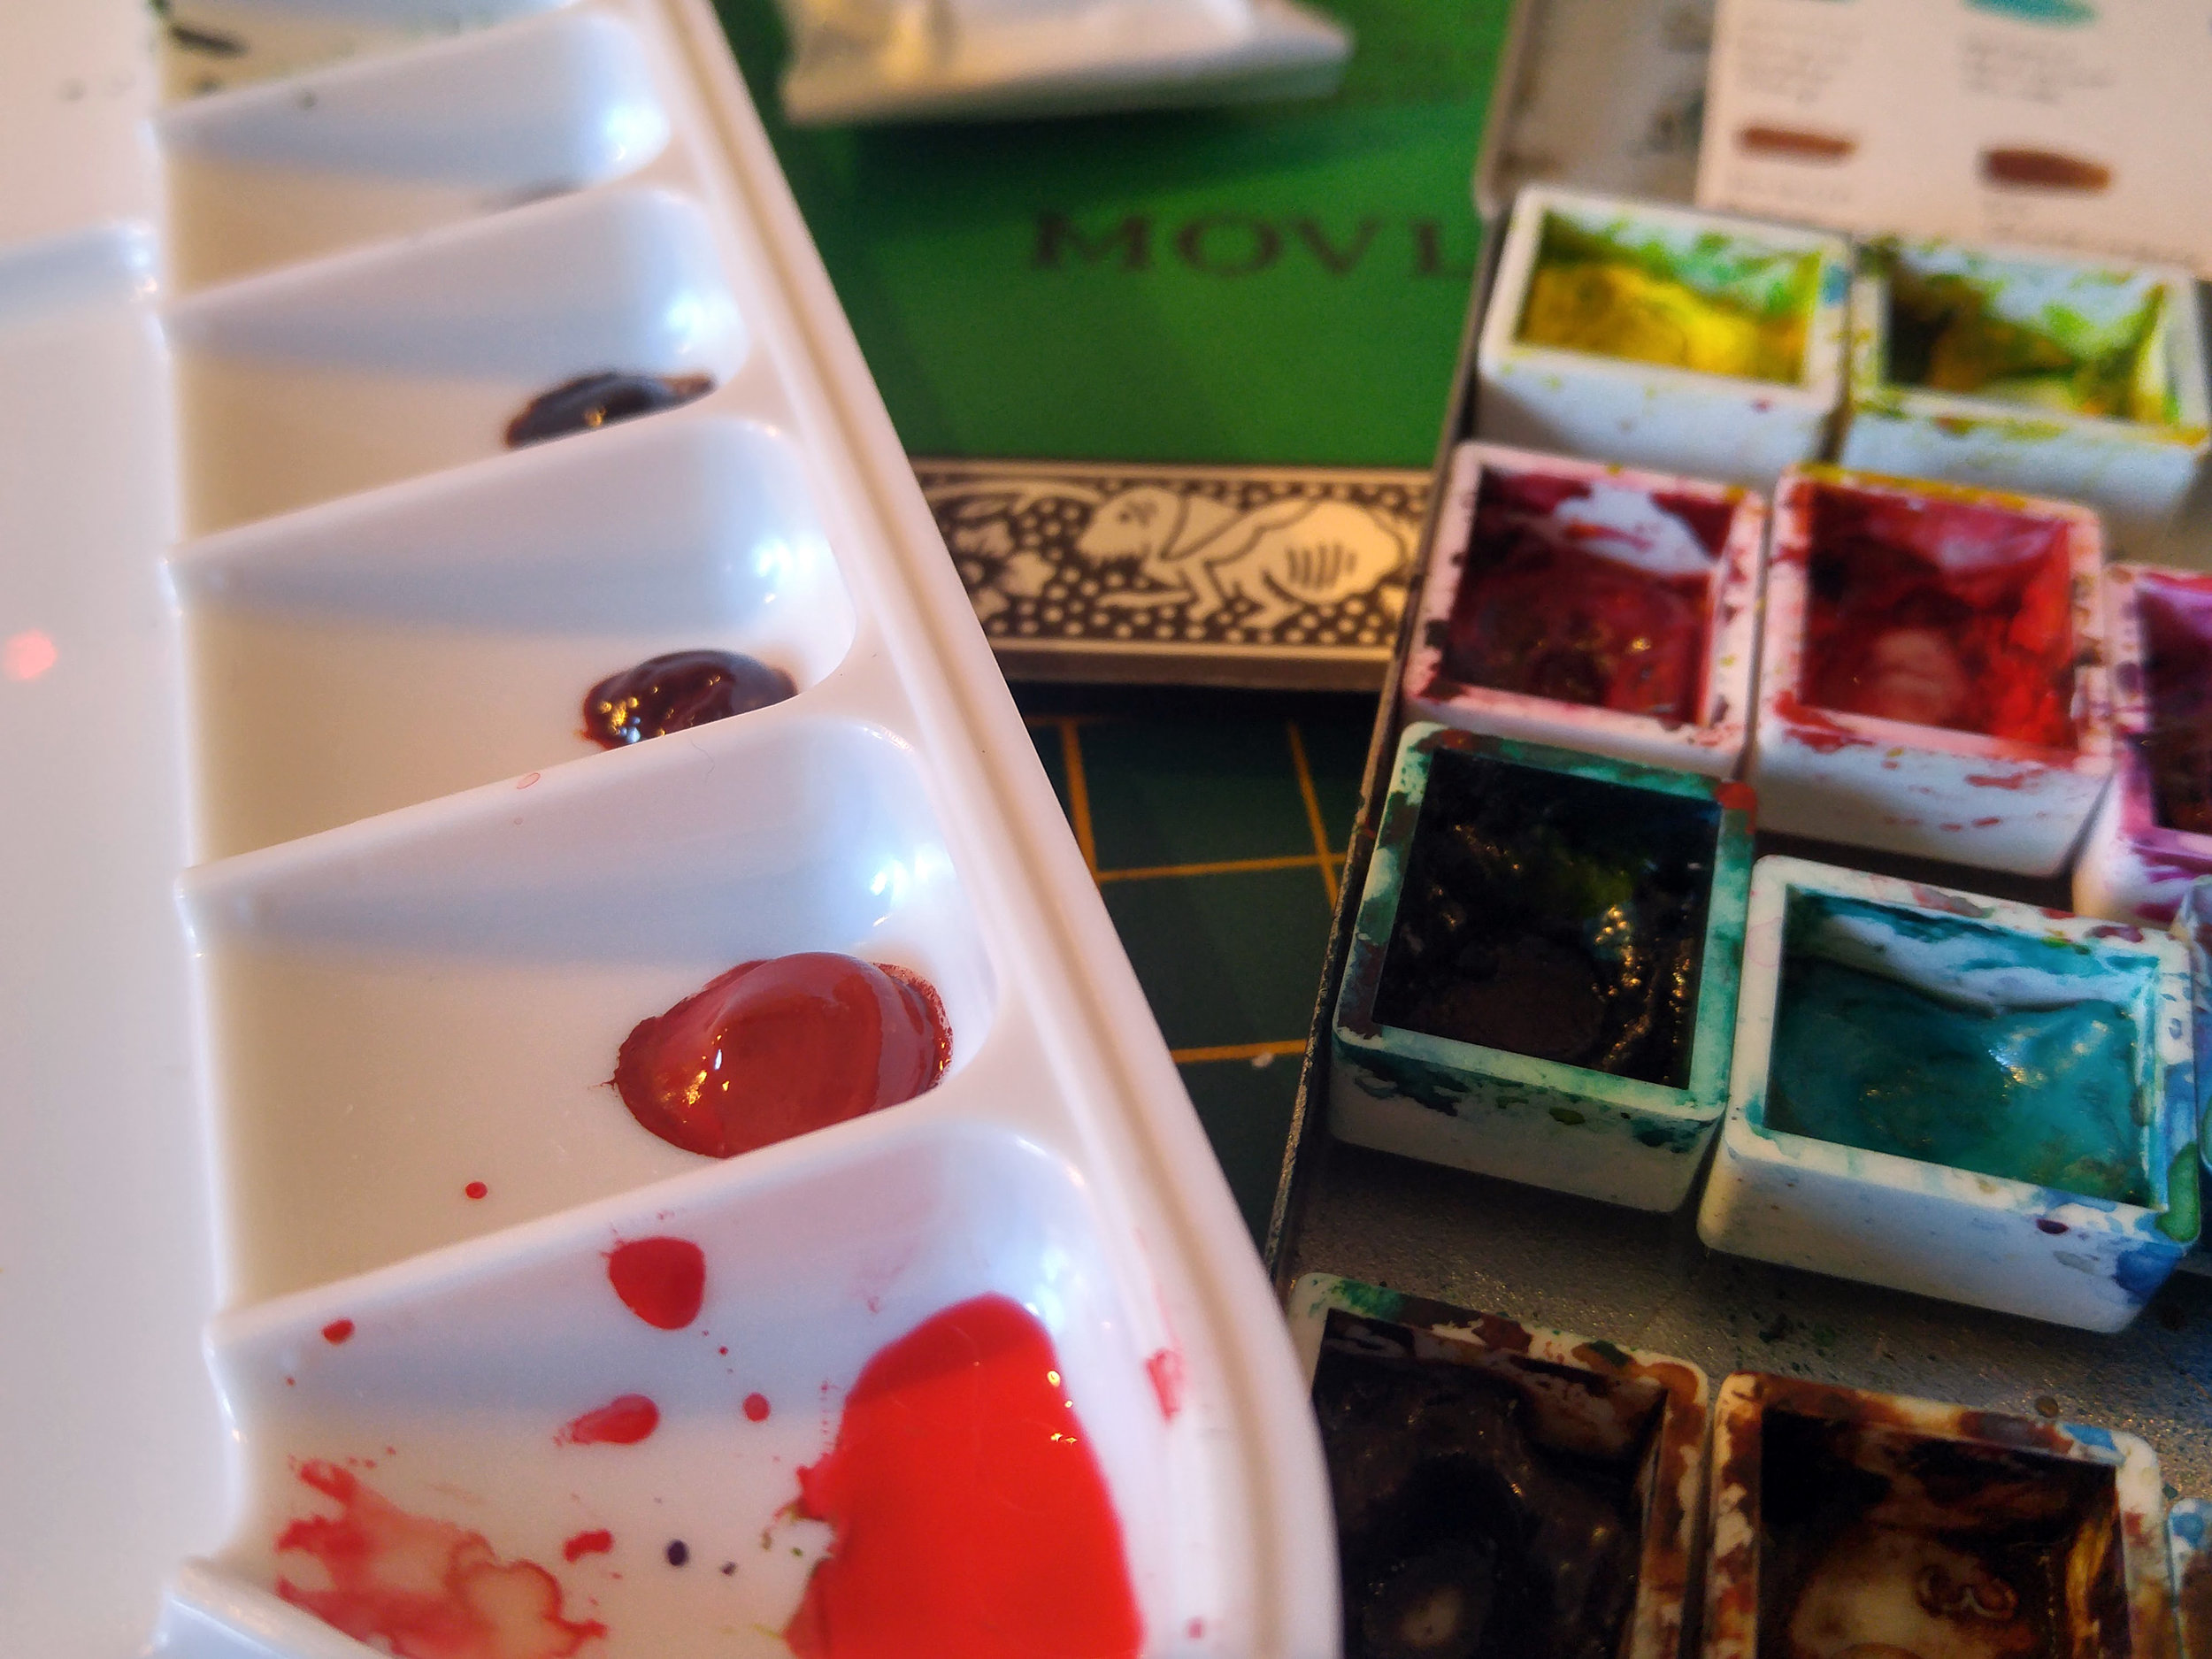
Now, I have a large palette. A Melting Pot of brands!
I use an old pencil tin to hold my half pans. I glued mini magnets to the bottom of the pans so they stay in the pencil tin while I move around.
I also have a palette with a lid that allows me to keep paint wet for more than one session.
All of my colors are now Artist Grade, meaning high quality. The "flow" is smooth. There are no chunks or flakes. The colors are incredibly rich.
3. Abridged Explanation
- Half pans are little square containers that are used to pour liquid paint into. You can buy them at art stores or online, usually about $.80 each.
- You can buy tube paint and let it dry in the half pans, or you can buy a palette with a lid that will keep your paint wet for longer.
- There is no quality difference between liquid paint from a tube and when it's dry.
- Low grade/entry level paint such as Cotman colors are OK for beginners while you get used to using watercolors. They are typically not as saturated/deep as Artist Grade, which are higher quality but more expensive.
- My favorite brands in order of preference: Sennelier, Daniel Smith, Holbein, Winsor & Newton Professional (Artist Grade)
- Colors: If you buy the travel/compact sets, your colors are chosen for you. This is perfectly fine and I did this for the first few months of my watercolor experience!
If you're buying tube paints, here are my suggestions:- Earthy Tones: Olive Green, Serpentine Green, Raw Umber, Burnt Umber, Indigo, Cobalt Blue, Nickel Azo Yellow, Aureolin Yellow, Indian Red, Crimson, Imperial Purple, Neutral Tint, Lamp Black
- Bright/Jubilant Tones: Lemon Yellow, Cadmium Orange Yellow, Cerulean Blue, Pthalo Green Deep, Permanent Light Green, Red Violet
If you have experience with a brand or palette you love, please share it in the comments below!
042. First Page Phobia
If you're like me, you have a stack of beautiful notebooks and sketchbooks, piled up and ready to be filled with magical creations. Their pages are crisp, clean, bright oceans waiting to be sailed.
Maybe they've been piling up for a while now.
Like...years.
I have First Page Phobia.
It's the fear of "ruining" a sketchbook, therefore I don't make any marks. I open to the first page, my pencil hovering just above the paper, my mind whirling between ideas and "don't do that.. that's a waste of paper."
Why would I let a blank page have so much power over me? I KNOW the importance of practice, and sketching/drawing is a hugely important step in developing my skills (even for painting).
I've had lots of time to think about it, and only recently came to this conclusion.
Ego.
I'm not talking about the popular manifestation of ego - "I'm the best!"
I'm talking about the textbook definition: "the part of the mind that mediates between the conscious and the unconscious and is responsible for reality testing and a sense of personal identity"
In other words, it's our sense of self-esteem. Our idea of ourselves.
When you sit down to a blank page, and you have the thought "I don't want to mess up," - this is our ego stepping in. We must learn how to surrender to the fact that everything we create is not a masterpiece. Our egos say, "No! We only create beautiful things that people will like!"
This is false. We cannot ever expect to draw anything beautiful without practicing, messing up, experimenting, and trying.
Rather than let the fear of failure stop us, we need to remember the importance of mistakes.
Making mistakes leads to improvement.
Children are not born with the ability to walk. They crawl before they stand up. They wobble before they walk. They walk before they run.
They fall. They get up again. And eventually, falling becomes rare.
Sketchbooks are our personal spaces. They are not meant to be shared, unless we invite the world to see (in this day that means posting photos online).
YOU choose what the world sees. I personally wish more artists shared their messy sketchbooks, mistakes and all.
It would remove the veil of perfection and instant mastery that admirable artists tend to carry.
Ways to get over First Page Phobia
- Skip the first page.
I do this almost every time I start a sketchbook. The first page always seems to be the scariest, most sacred page. It is the gateway to the sketchbook. But rather than let that fear of failure stop me from making any marks - I simply skip the first page! This gets me started, and whenever I'm ready (if ever) I can go back and fill that first page. - Have a private sketchbook, and a public sketchbook.
If you are concerned with what people will think about your sketchbook, once again that's the ego stepping in. Rather than fight those feelings - embrace them. Have a completely private sketchbook where you can fuck up as much as you want, write notes, and make random marks. No one will ever see it. At the same time have a "public" sketchbook - one you don't mind sharing. - Make your first drawing something you love - something you're good at. Rather than get stuck on what to draw, stick with what you know! If you're skilled at portraits, or creatures, or landscapes, or architecture, start with that!
The key is to just get started. Once you get something down on that first page, the rest is so much easier!
Do you have any suggestions to help get over First Page Phobia? If so, feel free to message me or leave a comment below!
038. On Originality
in Artist Diary
As artists, how are we meant to make an impression in an already impressed world?
Read More036. How Do You Price Your Artwork?
Today I'm going to dive into my method and thoughts on pricing artwork. I'm going to be brutally honest in this post. Please remember these are MY views based on my own experiences (7 years as a professional photographer, 2 years as a painter).
There isn't a magic formula that will work for everyone. But I'll explain what I went through to get to where I am now.
Fact: People want everything for nothing.
That's just the way it is. It's built into humans, probably going back to some survival mechanism. Now in a time of abundance, it still holds true. Can you blame us? It's awesome to get everything for nothing.
How many artists out there have had potential buyers ask why something was priced "so high," or request a discount or question your method of pricing a custom commission?
When it comes to your art, you can try to educate buyers, explaining that they aren't just paying for raw materials or time, but also your unique artistic vision.
Some might get it. Most of them will move on.
And that's OK, because the world is a big place. There are lots of other people. The last thing you want to do is undervalue yourself. That is a crash course for 1. being broke, 2. believing you are worth less.
Once in a while you run into people who truly understand the value of what you're doing, and are willing to pay what it's worth without question. When you do, you realize your true value as well. It's like their passion and understanding and desire to own a piece of your art is the equivalent of them holding up a mirror, and you see what they see.
First, a little background (brief dive into my photography career, where I started). As I said, I learned the hard way.
Getting my clients to trust me and be comfortable in front of my camera was not always easy. As a photographer I was interested in capturing the genuine moments. I made sure that I was completely genuine around them, which helped. When they saw me geeking out about beautiful light, or fun angles, they'd loosen up and be natural. Eventually I built a portfolio of images that showed clients in their best, most natural light, and that drew more clients who wanted this experience. Their experience is worth just as much, if not more than the images.
Photography is an INCREDIBLY competitive field. When I started out shooting weddings, it was right around the time that every photographer was starting to offer "unlimited hours" packages. This meant, the photographer would show up whatever time the client wanted on the wedding day, and leave whenever they wanted (usually after the send-off at the end of the night). Sometimes more than 15 hours (like showing up at 7am for "getting ready shots" and leaving at 2am after the party). This was accompanied by a fixed fee for the entire day.
As a new photographer trying to break into the industry, I went along with the trend and offered this option. I wanted to shoot at least one wedding to have something in my portfolio, so I advertised on Craigslist, Unlimited hours and photos for $200 (with the obvious caveat that it was my first wedding).
Guess how long it took to book a client?
1 day.
Yep, I was an idiot. I completely undervalued myself, because I honestly didn't know any better.
It was a wake up call the size of Mt. Everest. I shot for 9 hours, took over 2000 photos which took me 4 days to edit, plus the months and months of correspondence leading up to the wedding to go over itinerary and ideas. Other photographers offering a package like this charged minimum $1500.
I honestly didn't start charging what I was "worth" for another two years. I was hungry for experience and wanted to guarantee a busy shoot schedule so I could learn and grow. Plus I had a full time job so I wasn't desperate for money. Photography was my mistress on the side.
I experience countless clients who wanted as much possible from me for as little money as possible. Eventually, I had to put my foot down and stick to my guns when it came to pricing.
Sure, I lost out on a LOT of business when I started charging more, but the business I gained was made of much better clients who truly appreciated my artistic vision. Less jobs didn't mean less money. It was less jobs, at a higher price, with healthier relationships and deeper bonds. This benefits everyone involved.
One of my weddings that was published in The Knot magazine and several other publications. This couple didn't question my pricing. They saw the value in what I provided, and as a result we both came out with an amazing experience and beautiful images.
You have to remember, there is ALWAYS going to be someone out there who undercuts you, no matter what business you're in, and especially in a creative field.
There is always someone more desperate, more cunning, more skilled, more naive, or any other number of things that lead them to charging less for the same product.
If you don't believe in your own value, how can you expect anyone else to? If you charge less, they will pay less.
If you charge more, they might pay more. And here's where it get's tricky.
Brutally honest moment #1: You have to take an honest look at your work and understand where it fits among your industry peers.
Sure, I wanted to charge $2000 right away for a wedding just like other photographers I looked up to, but until I had a few years of experience, my work was not worth $2000. That's a hard pill to swallow for some.
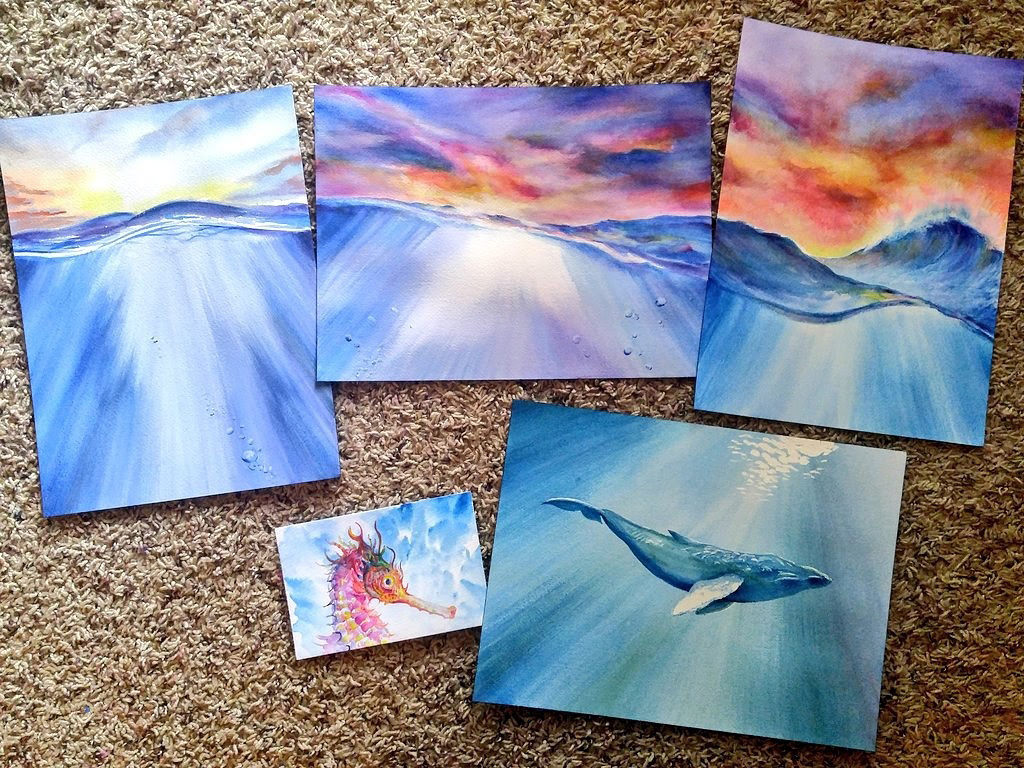
Painting
One of the first paintings I ever sold. To my aunt.
When I started selling paintings, I still had my full-time job, so again, I wasn't desperate for money.
Brutally honest moment #2: If you are desperate for money, art is the wrong field.
Some artists make a TON of money. Those few, the 1% (or much less), are idols to a lot of us. They are living the dream!
And of course, we can all aspire for that level of success.
But most of us will make a humble living, perhaps barely break even, while pursuing the dream.
If that scares you, that's OK. It scares the crap out of me.
But if you read that, and still feel like you HAVE to create no matter what, that making money is secondary, then you may just find the type of success that truly matters.
True fulfillment.
And THAT is priceless.
While selling paintings involves a lot less client interaction than photography, I've realize that there's a ton of crossover between the two disciplines.
Also, my experience as a painter is unique to much of the established (traditional) art world, because it began online, while streaming on Twitch.tv
By painting while streaming on Twitch, my clientele was watching me create the work, yet surprisingly it didn't lead to them putting less value on it (like, I was afraid people would think, "oh that doesn't look that hard, why does it cost so much?"). In fact it was the opposite. Viewers saw me creating something from start to finish, and so they were part of the experience. Much like photography, that experience becomes part of us, and they want to take away a tangible item that expresses it = a piece of art.
A painting is more than it's materials. It's a piece of the artist. Something that was at one point trapped in imagination, came to life, and can now hang on a wall. How magical is that!?
All of the artwork I've purchased has come from a NEED to own it. It reached into me, grabbed my emotions, and shook me until I gave in.
Pricing drawings and paintings seemed really arbitrary to me when I started out. I didn't go to school for business and I didn't talk to that many artists before selling my own work. At first, I under-priced everything. Again, since I had a full time job, I wasn't desperate for money. Painting and streaming was my new mistress on the side.
I started out by barely charging more than what the materials cost. However, after a while, I began to realize I wanted this to be a career, and I had to take it more seriously.
To my surprise, when I started increasing prices to reflect what I thought they were worth, my sales didn't drop. I was actually stunned the first time I sold anything for over $100.
I came up with a "formula" for pricing, that I still use to this day (except for special circumstances).
$Cost of materials + $Time ($50/hour) + $Shipping & handling
The cost per hour (time) is the variable. It includes prep, painting, and finishing.
You also may need to add sales tax. Consult your local laws.
I paint very fast. Like a fully rendered painting takes me a couple hours (or less). So charging a higher rate per hour is necessary to make it worth my time.
But the number $50 per hour seems sort of arbitrary right? Not really.
Look into any creative field at what the professionals charge (architects, graphic designers, etc) and $50 starts to look cheap.
DO NOT CHARGE LESS THAN MINIMUM WAGE! As an artist, what you offer is worth far more than a latte. Ok that doesn't exactly translate well, but what I'm saying is, the skill and vision it takes to create a beautiful painting is more valuable than the skill it takes to make a latte at a local coffee shop where you get paid minimum wage (I served coffee before so I can say this without hesitation).
Another strategy that I've seen artists use is charging per square foot of a painting. Just break it down! I personally don't use this formula because size doesn't effect the difficulty of the contents and therefore how long it takes me to paint.
As your work develops, so should your storefront.
Think about it. Compare the two paintings below and tell me which level of quality you'd pay more for (regardless of size).
If you continue to offer your older art on your storefront (like Etsy) at the same prices, it better stack up in terms of quality to your new stuff. Otherwise you're sending mixed signals to your clients.
This requires a constant purge and being REALLY honest with yourself (ouch).
Can you confidently say that every piece of art on your Etsy shop (or whatever you use) is up to your current standards? Is everything you're offering representing your vision?
I found that by painting so often, the pure volume of my work was leading to fast improvement, and I was running into the scenario that what I posted on Etsy a month ago fell far below the quality of what I posted today. Now, that's all fine and dandy if I lowered prices on the older stuff, OR if that older stuff is still really good. But that was rarely the case.
Brutally honest moment #3: Stop letting sentimental attachment cloud your vision of what something is worth.
I can't tell you how many times I painted something, had a proud little "breakthrough" (like finally painted a good cloud), so I listed it for top dollar. 9 times out of 10 it didn't sell until I lowered the price to what it was ACTUALLY worth. Be realistic. Sure, maybe it's the best you can do, but don't forget to compare to industry peers. Yea, ouch.
Brutally honest moment #4: If you truly LOVE something, don't sell it.
There was a point that whenever I created a new "favorite" piece, I would tack on an extra $100-200 because the thought of selling it hurt my heart. I've sold several pieces that I wish I still owned, because of how meaningful they were to me. I regret selling them. I regret feeling like I NEEDED to sell them.
So if it meant so much to me, why did I even allow the chance for it to be "taken" away by listing it at an absurd price on my storefront?
I was driven by the unfounded idea that, if it sold for the higher price, I would be able to pay rent, and all is well.
For fucks sake. There are other ways to pay the rent. Feeling the desperate need to sell everything you make is just going to lead to misery. I am learning slowly that there are some pieces that an artist creates that are meant to stay close. When you create one of those, you feel it in your heart of hearts. Trust your instinct and keep it.
Sell prints of it instead. Sell postcards and bags and tshirts. But keep the original. Your future self will thank you!
Final brutal advice: If your work isn't selling, hit the "books."
By this I mean, get off your high horse, and back into the studio. I do this myself constantly. The ego is a powerful thing. Sadly it comes built-in for humans.
Study.
Work.
Advertise differently. (this is going to be a whole other blog post)
Study more.
Improve.
They don't call it a hustle for nothing.
Just because you made something doesn't mean it's going to sell. I used to list every single thing I made on my Etsy shop, even studies. A lot of times it was because while I was painting it, people who were watching on my Twitch channel were raving about how much they loved it. Or I posted it on Instagram and people asked "where can I buy this?"
But once I listed it, it didn't sell.
One of the first Seascape paintings I made (7 months ago), people begged for me to add it to Etsy. It never sold.
Most recently sold piece.
So, either everyone was lying, or it wasn't worth what I was selling it for. So I had to be honest with myself.
It was a study, Sure it was cool to look at and kind of fun and expressive. But was it worth selling and shipping? Probably not. But in creating it, my skill improved, and you better believe the next time I paint a fully rendered landscape that involves elements from that study, it will be good. And THAT painting will sell.
Ok so, I hope at least some of this was helpful. It's all just been me rambling about my own experiences. We mainly just have to be honest with ourselves. Work hard. Enjoy what we do. I'm sure in another year I'll have a new outlook. I'm learning as I go!
What are your methods? Do you have a success or horror story to share or a solid formula that works for you? I'd really love to hear them. Please feel free to send me a message or post in the comments below!

030. Having a Life Plan and How to Ignore It
in Artist Diary
Where am I at with my goals? Where are you at with yours?
Read MoreInk drawing, 2016.
023. An Artist's Sacred Space
in Artist Diary
How do we balance the need to share our artistic voice with our need to experience that sacred space?
Read More
018. Providing Prints and Products of Your Artwork
Today I'm going to offer some of my own experiences of selling prints and products of my artwork.
Read More017. Artists: Against the Grain Lifestyle
in Artist Diary
So how does one navigate through life’s challenges while hustling to stay on that path?
Read MoreRegular photo (left) / Long exposure (right)
014. Photography Tips: Long Exposures for Moving Water
Tips for capturing moving water.
Read More