127. My Experiences with Pochade Boxes for Oil Painting - Plein air in Scotland
THIS POST IS NOT SPONSORED BY ANY COMPANIES. I AM NOT PAID TO MENTION ANY PRODUCTS. THIS IS THE RESULT OF 3 YEARS OF TRIAL AND ERROR AND WHAT I LIKE/DON’T LIKE, AND WHAT I WANT.
However if you end up deciding you want to purchase anything I mention, using my links help support me!
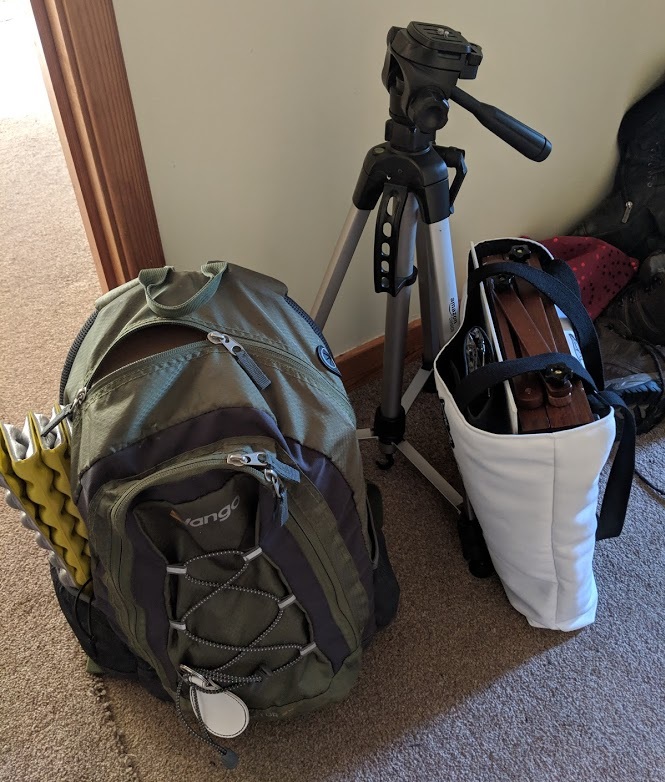
Plein air painting supplies ready to go by the door.
Let’s talk equipment! If you’ve ever painted outside, you know how it can sometimes be a hassle, especially with oil. Yet I always find the reward is far greater, so no matter what I keep doing it. Over time I’ve found ways to make things a little easier, and the most helpful tool has been the pochade box.
When I Started
Since I first picked up watercolor in early 2016, I loved painting outdoors. It forces me to really take in my surroundings and connect with nature on a deeper level, and watercolor was an easy thing to bring on my weekly hikes. It dries very fast, which was ideal for my short sessions (sometimes as little as 10 minutes).
For a long time I was happy with my little watercolor and gouache kits that could easily fit into my pocket for short hike-paint sessions. I was balancing everything on my lap (and sometimes it all ended up in the mud).
Eventually I had the itch that almost any painter experiences. Trying something new…something really different, not exactly knowing why or how it would manifest, but knowing you must try.
For me that was oil painting.
I had visions of hiking to a beautiful location, setting up a pochade box, cracking open the oil tubes and layering thick, juicy paint up with my palette knife.
It was time to level up.
My Pochade Boxes
I started oil painting in early 2018 after months of research and accumulating supplies. Oil paint really intimidated me at first, I guess partially because of the “rules” you must follow like “fat over lean.” Plus the fact that I thought you HAD to use turpentine, and introducing foul smelling chemicals into my workflow really turned me off. Eventually I learned that you can indeed use oil paint without the use of harsh chemicals.
After I finally took the plunge and got my first set of oil paints, the usual string of failure-successes that accompanies any new artistic endeavor began. By that I mean I learned a lot very quickly by trying and failing and trying again.
One of my big frustrations was that I was constantly having to move everything around because I so often switch between different mediums. This made things more difficult because I had one small desk and limited storage and drying space. Soon I started to think how nice it would be to have a pochade box in the studio, so when I was done painting, I could close it up and set it aside when I was switching to watercolor, then open it up again the next day and continue painting.
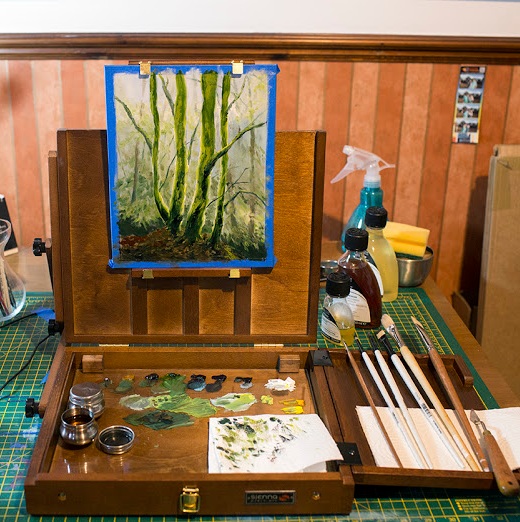
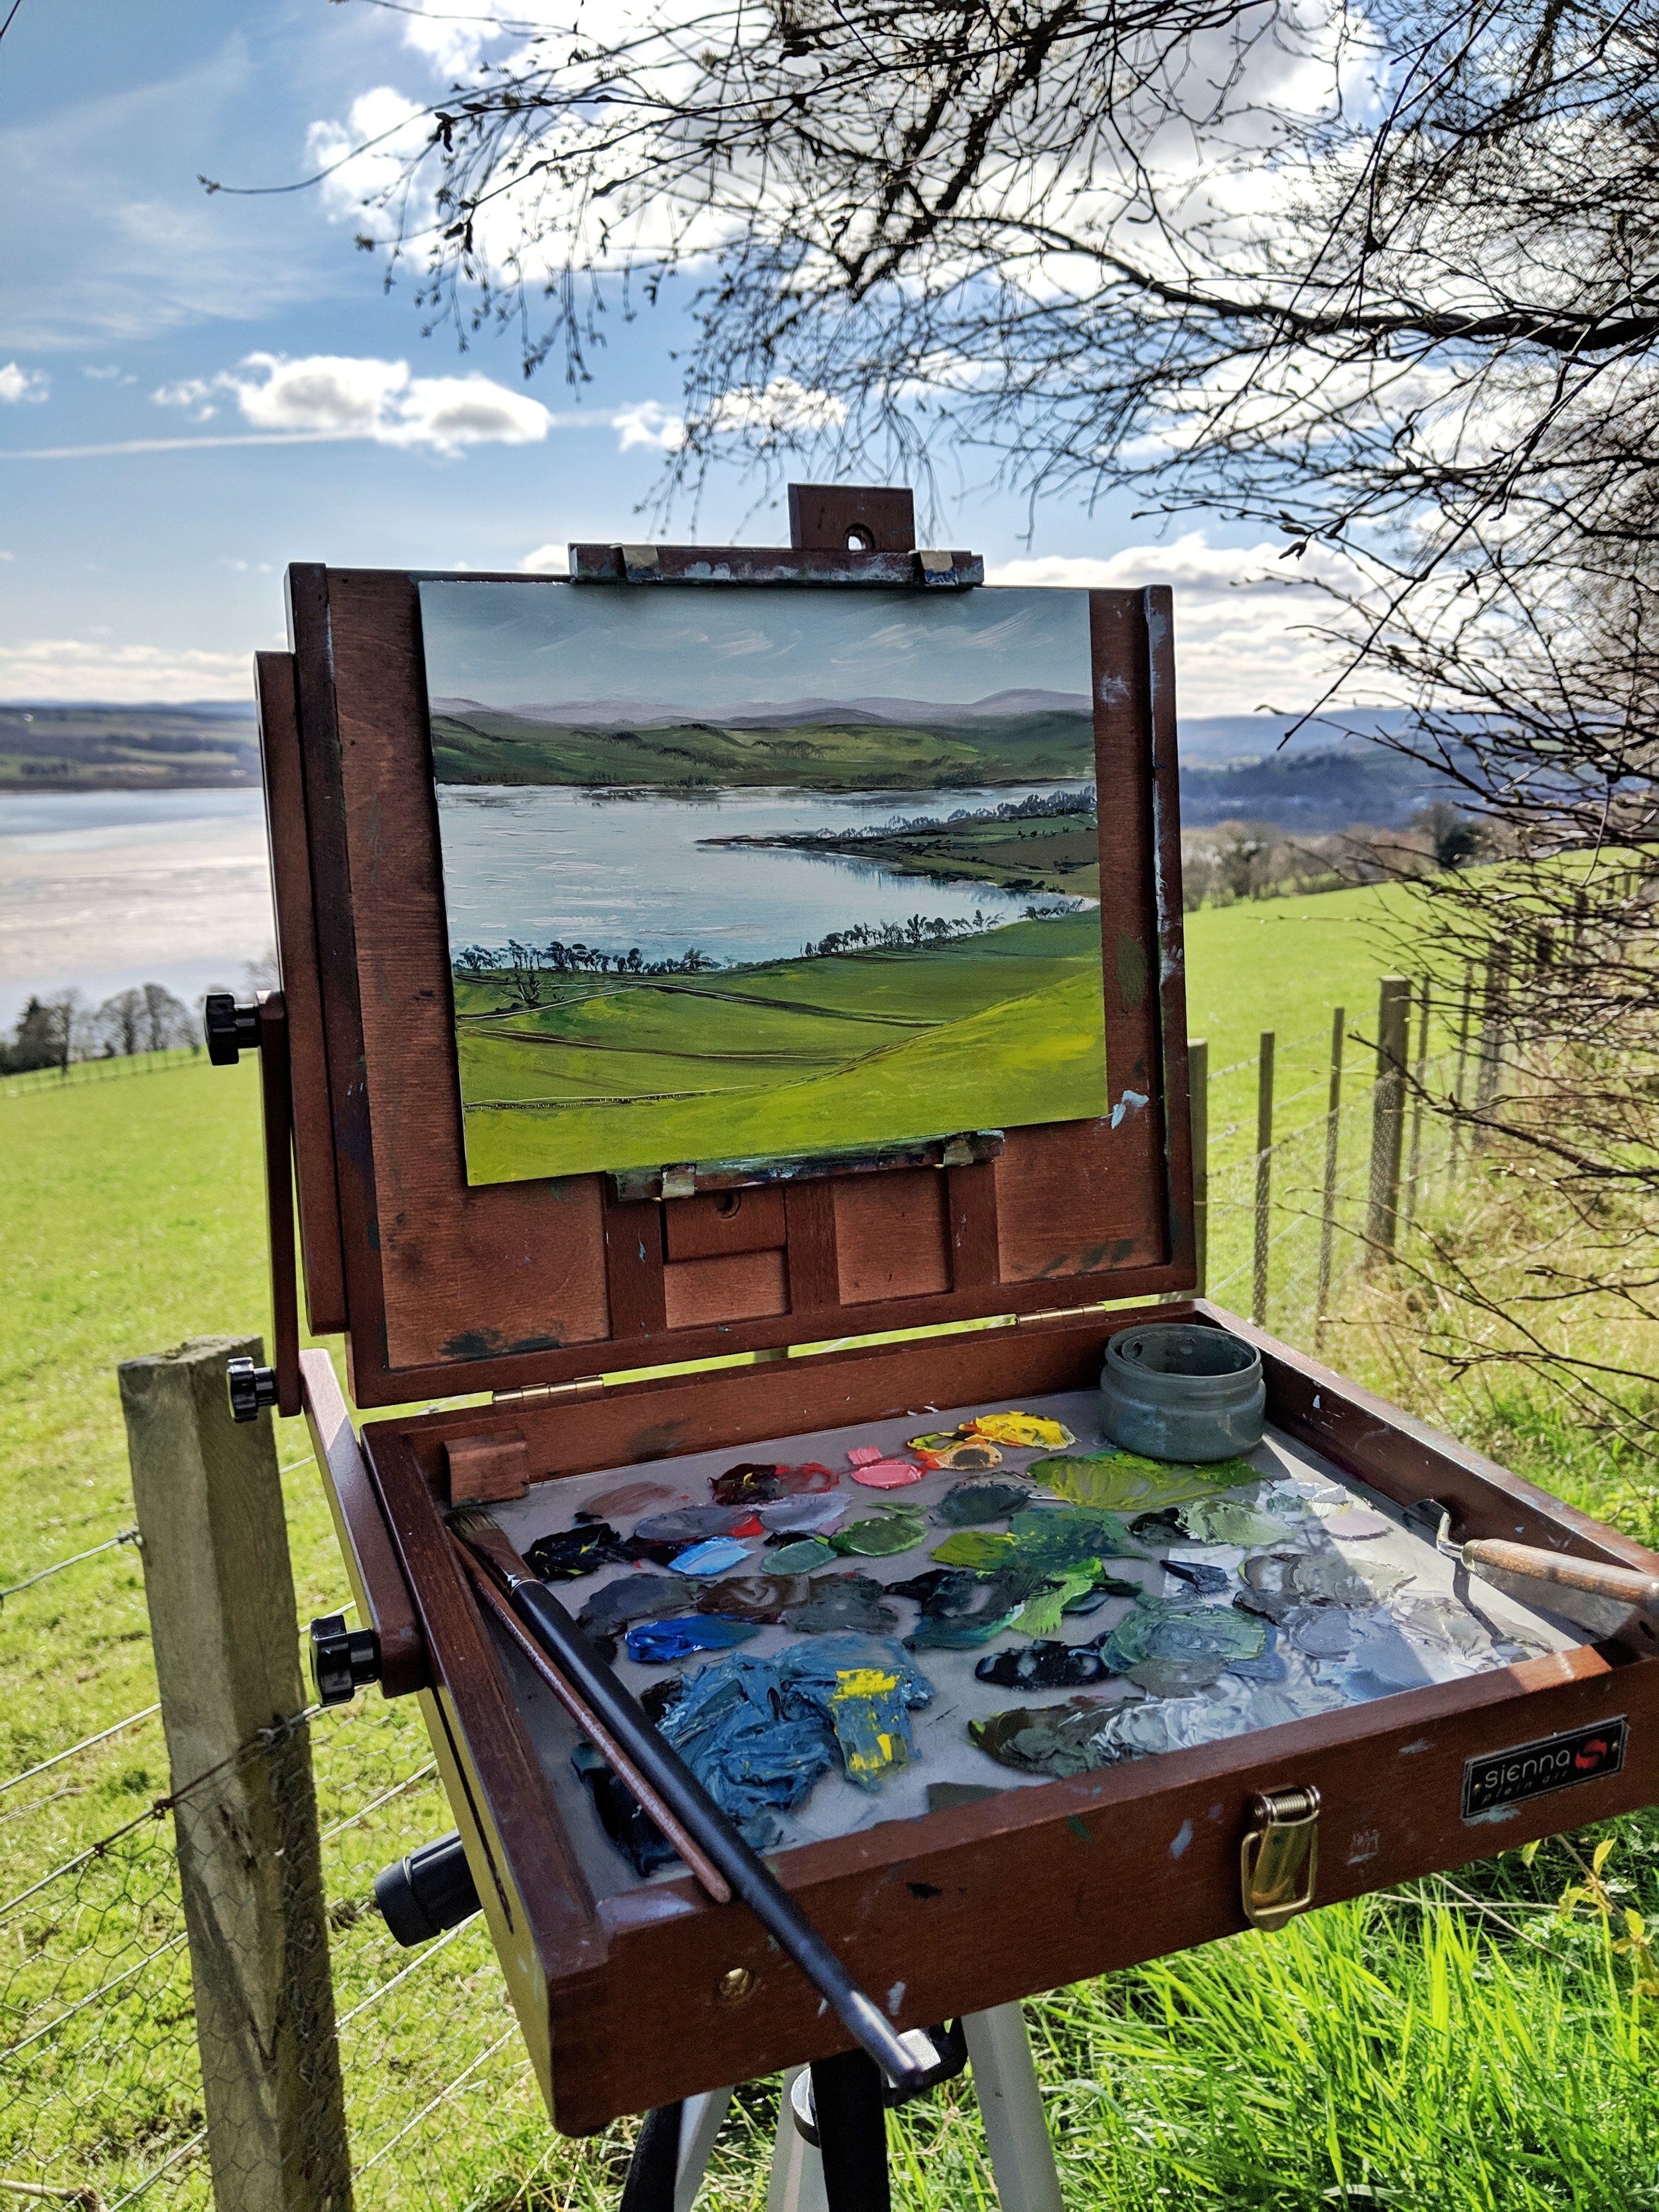
Sienna Pochade Box (Large) Review
I purchased a Sienna Pochade Box (large) after reading countless rave reviews and watching videos online. It looked like the perfect tool!
March 2018
Watch my unboxing and first impressions video.
In the beginning, I used it frequently in my studio, because I loved being able to close the lid and keep my paint fresh until the next day. It was a great way to get used to the box before fiddling with it outdoors. It was winter, so I wasn’t venturing out for plein air, but I felt confident that in the spring I would start my outdoor oil adventures.
Fast forward a year later and I have only used it a handful of times outdoors (because I usually take my smaller pochade box - see next) but it has been great! Having the luxury of a big glass mixing space outside is hard to beat, so I definitely plan on taking it out more. I haven’t tested it outside in foul weather or heavy winds, but it did fine in calm, sunny weather!
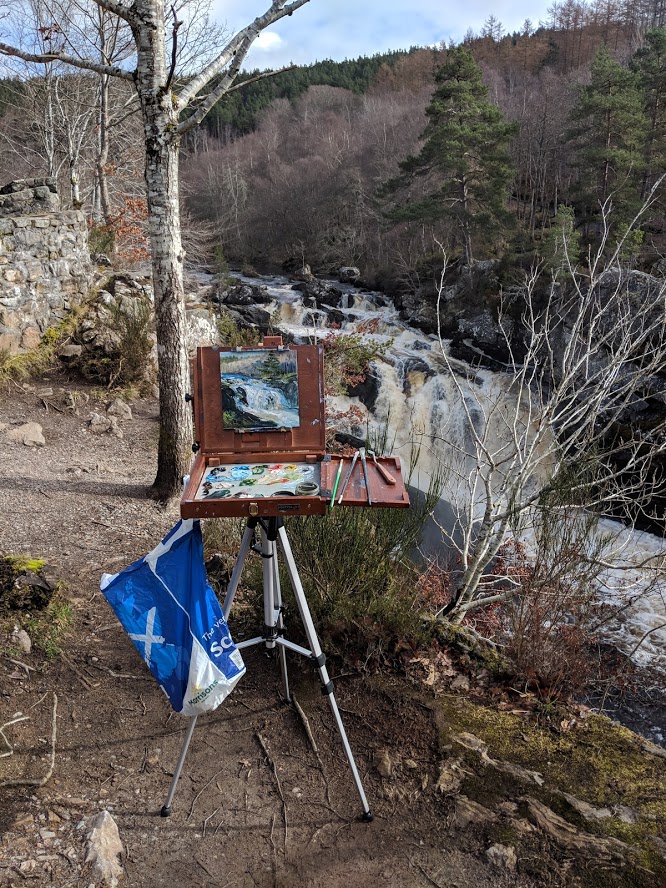
March 2019
Watch me use the Sienna box outside.
Sienna: The Good
I’m extremely happy with the Sienna, especially in the studio. I can set it on a surface or pop it onto a tripod. It’s wonderfully convenient, and holds up to 17” canvas.
The glass palette can be removed by unscrewing the small wooden squares that hold it in place. This means you can put a piece of white or grey paper underneath to see your colors better, as well as thoroughly clean it when necessary.
It’s gorgeous and well made! No bits or pieces have fallen off…yet.
Sienna: The Bad
It does not have a place to store the wet panels, like some other boxes do. This isn’t really terrible, since you can purchase or make wet-panel carriers.
Since the box is made of wood, the tightener knobs feel somewhat fragile. I recommend not over-tightening them, since the more you do that, the more they will wear down and eventually could break.
It doesn’t feel quite as strong as my Guerrilla ThumBox (see next) so I am extremely careful when it’s on a tripod, as I think one fall would break it into pieces (especially the glass).
It is very slim and easy to carry when it’s packed down, but it doesn’t fit into my backpack (well, it does, but I can’t zip it closed!). I would have to get a bigger backpack if I was going to hike far with this box.
As you can see, none of these are deal breakers.
Purchase the Sienna Pochade Box (Large)
➤ (USA) https://amzn.to/2W5MNsp
➤ (UK) https://amzn.to/2W320ut
➤ (CAN) https://amzn.to/2zF5gEZ
Guerrilla Painter Thumbox 6 by 8 review
After only a couple months with my Sienna pochade box, my husband surprised me with the Guerrilla Painter ThumBox 6x8 for my birthday, because he heard me talking about it on my stream! This was exciting because it is small enough to fit in my backpack, and at that time, I was still intimidated to take the Sienna outside.

My first trip out!
Watch my unboxing and first oil plein air video.
Within the last year, I have taken this box out dozens of times, and discovered some things that really annoy me. However, the convenience of it means that I use it anyway, and because of that, I paint outside more often.
After a year of using this pochade box, I have a lot of insights to share!
Guerrilla: The Good
First of all, it’s extremely lightweight and compact. This is excellent for putting it in your backpack for hiking to a painting spot.
It’s actually super strong! I have dropped this box 3 times from a couple feet high, once down a steep embankment of rocks near the ocean where it bounced wildly before landing on it’s top (luckily it was closed). The box AND the painting inside were totally fine!
It fits a handful of small paint tubes and medium jars inside underneath the palette. Everything you need can be contained within, including two wet panels in the lid (back to back). This is EXTREMELY convenient when you are hiking and don’t want to carry a separate wet panel carrier.


Guerrilla: The Bad
While it’s great that the wet paintings can be stored in the lid, the small metal brackets that keep them in place are also a downfall during painting. I’m CONSTANTLY hitting them with my brush and palette knife, struggling to fill the whole canvas. Since it means the painting surface is tucked back slightly, I find it extremely difficult to use my palette knife on the right side and bottom edge of my canvas. At times I literally have to pull the canvas out and hold it with my left hand while I paint. This is very messy and very frustrating.
The lid/bracket design also means you have no way of securing a portrait orientation canvas that is less than 8 inches wide (see above). You just have to kind of lean it in there.
The palette is wooden, which easily stains, and unless you scrape and thoroughly clean it after each paint session, it will slowly build up and leave an uneven surface (mine is hopeless).
Review after a year of use:
My patience is quickly running out with the metal brackets getting in the way of my palette knife. It often means I am changing the way I paint. There are add-on canvas holders you can buy to raise the canvas up and out of the box, but it’s cumbersome and just one more thing to mess with. This issue makes me want to save up for a different box. In addition, I’m really tired of the wooden palette!
This box is convenient, so I’ll still use it for as long as I need to. But it’s time to level up.

Purchase the Guerilla Thumbox 6x8
➤ (USA) https://amzn.to/2y8spz5
Elsewhere: Go directly through their website.
Ready to go boxes I would consider buying:
After a year of lots of backpack plein air painting, sometimes in extreme conditions, I’ve come to realize that my ideal system needs:
Extremely fast assembly.
Metal construction.
Glass or high density plastic palette.
I realized that since I always have my painting backpack with plenty of pockets, I don’t need everything to fit inside the pochade box. This means the “ideal” system can be more compact.
Lots of people make their own custom boxes, but the only tool I own is a screwdriver. Therefore I’ve researched many premade options that are my “perfect” system, as well as DYI assembly of items that could work.
STRADA
Most plein air painters have heard of the newest, hottest easels on the block: STRADA.
With good reason too, because they are super strong metal, lightweight, and very well designed. They are minimal, which is highly appealing. They have plexi palettes, another huge plus. They are expandable which means you can buy different side trays/inserts, even the micro can take an extension for 14” panels.
They know they have something special, and they charge a pretty penny. If only I had known what I know now… I could have bought one of these for the same price as my Sienna! (after import taxes it was about $230).
My ideal choice: STRADA Mini $265

STRADA offers several sizes.
New Wave u go Plein Air Anywhere Pochade Box
Me: “I will never buy another wooden pochade box again. Unless it’s this one.“
There’s no fussy bits. Everything is super well designed and sleek. It uses a system of super strong magnets to keep things place, so you don’t have to worry about broken knobs in the future.
The biggest size (11 x 14) weighs only 3 lbs.
Includes a high density plastic palette, but you can upgrade to glass. It also has add-ons like most boxes.
My u go choice: 8.4 x 11.25 $203
Purchase the U.Go Plein Air Anywhere Pochade Box
➤ (USA) https://amzn.to/2ztLgVt
➤ (UK) https://amzn.to/3bJ78ut
➤ (DE) https://amzn.to/35bYJgp

Assemble Your Own
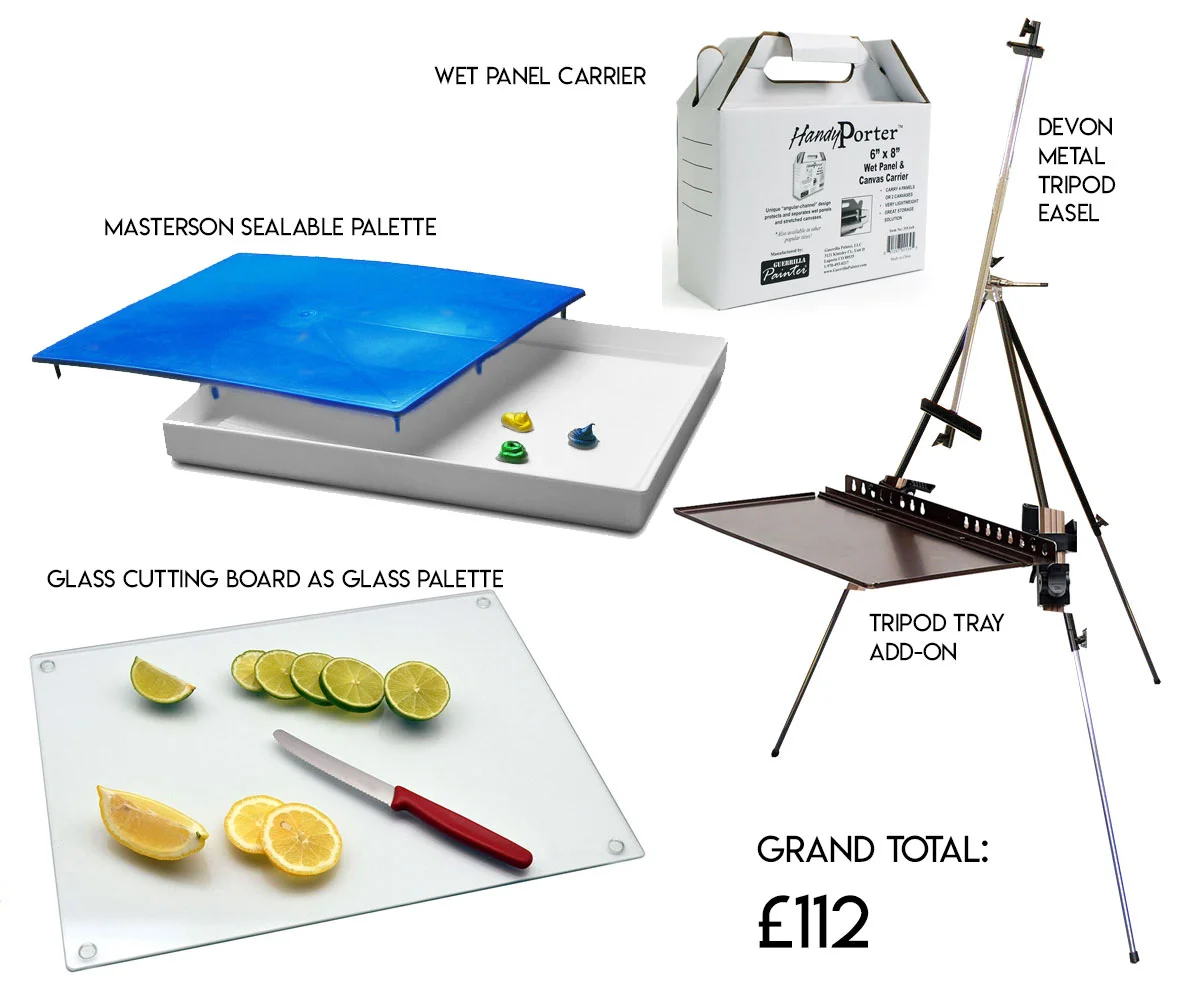
If you’re creative and have tools, you might be able to build your own! Plenty of people have done it, there are lots of interesting videos out there. It also means you can customize things to your taste. But if you’re like me and don’t have tools, with a little research you can assemble a decent system for around £100.
Devon Metal Easel - This one is bare-bones. There’s no storage or palette, so you’d have to get all of that separate. I’m not sure how sturdy it is, but it would be fine for a less windy day or quick paintings. Ken Bromley has several other similar options in the “Portable Easel” category.
Tripod Tray: Clips onto any tripod. Might not be very sturdy, but it’s cheap and easy. You could add your own glass or plastic palette.
Masterson Sealable Palette: I’ve used this in the past for storing acrylics for several days, and it really works. Just beware that where there is moisture, things grow (aka mold). So if you use it for wet media, add a drop of clove oil, or just make sure not to let it sit for too long. If using with oils, you can pop it into the freezer between sessions and your paint will last for ages.
Cheap Glass Palette: I use a glass kitchen chopping board because it was a fraction of the price as the large fancy glass palettes on the market. It fits inside my Masterson sealable palette. This is where a tripod tray comes in handy, I wouldn’t want to hold this during a paint session!
(USA) https://amzn.to/2KD2Bxt
(UK) https://amzn.to/3eZjsJ5
Carrying Wet Panels
Obviously if you buy a pochade box (or make your own) that doesn’t have a place to store wet panels, you’ll need to buy that separately. Wet Panel carriers come in all sizes and materials. I’ve been pleasently surprised by one of the cheapest options on the market: Handy Porter by Guerrilla Painter


Handy Porter by Guerrilla Painter
I’ve been using the 6x8 size for about 10 months, and they get the job done. They are just cardboard that you assemble yourself into the shape above.
They are super cheap and capable of fitting in my backpack on top of my Guerrilla Painter Thumbox 6x8. After about 8 months of use, I noticed the seams of the box are starting to separate. Nothing a little duct tape can’t fix.
But if you want to invest in something that won’t crumble under weight or disintegrate in water, I’d go with the most popular thing on the market: Raymar Wet Painting Carriers
They are made with fluted polypropylene plastic carriers which makes them more sturdy and waterproof. This also means they are still incredibly lightweight, as opposed to wooden versions, so it’s ideal for hiking.
Wooden Options
If you want something more robust, there are lots of wooden panel carriers on the market. I’ve seen tons of artists make their own and you can watch DIY videos on YouTube. But again, if you don’t have tools, you will be looking at premade versions online.

In the UK, Colin Joyce offers these made-to-order carriers in a variety of sizes.
Edit: I recently purchased on of these and wrote a little review. LOVING it!

In the USA/Canada, these PanelPak carriers have become popular. I think they have a pretty good idea for a very minimal carrier!
Get creative!
A quick google search will bring up a lot of ideas, things you’ve never thought of! This blog for example, had a great comment.
”I found another solution one time when I forgot my panel carrier. I had 2 same size panels, and some painters tape. I balled up the painters tape into pea-size balls, pressed one in each corner of the panel on the painted side, carefully positioned the other panel facing that face and then rubber banding them together, or even using a stretch of the painters tape to hold them together. The small balls in the corners keep the painted surfaces just enough away from each other, and you have the clean backs on the outside of your "package" to carry them home or even lay them in your car without getting them or your car dirty. Once home, you can quickly smear the still wet paint into the corners where the tape balls might have lifted off the paint.“
Things to look for:
Handle or shoulder strap for the heavier carriers.
Are the wooden boxes treated/sealed to protect from the elements?
If the painting is exposed, will you be worried about dust or debris getting stuck in your paint? Depending on where you are traveling you may need to go for an enclosed version.
Read reviews!
I think that wraps up my experiences with my plein air painting supplies. I’ve learned so much in one year, and I hope my thoughts might help someone who is just starting. We all know how easy it is to spend money on art supplies as we search for our perfect fit. Nothing beats experience, so hopefully this helps!

Happy Painting!
This blog is not sponsored at all. The views expressed here are my own, from personal experience, and it is recommended that you do your own research.
If you decide to purchase anything I mentioned, using my links helps support me! Thank you!